Communication between host and guest VM when using virt-manager

This is a joint post by @nevj and @Rosika

and

It reports on our collaborative investigations into the virt-manager package which uses qemu/KVM to run virtual machines inside a host Linux system.
In particular we have looked at various ways of communicating between a guest Linux system running in a VM and its host Linux system.

Our post consists of several ‘chapters’ each written in markdown and copied into itsFOSS as a series of separate replies.

Contents

  1. virt-manager networking setup
  2. Thunar, ssh, scp, and sftp
  3. virtiofs filesystem mounts
  4. nfs filesystem mounts
  5. qemu-nbd mounts
  6. device mounts
  7. rsync

We hope this may be useful to someone who has used virt-manager but
has not yet conquered data sharing .
This is also an experiment in using Markdown
to prepare a post offline.
Please let us know of any issues.

4 Likes

Virt-manager network setup

We assume that virt-manager has been installed
in a Linux host, and
at least one guest Linux system has been installed
and is running.

The first thing to learn with virt-manager is how to find the settings.
Under View on the QEMU/KVM Window, there are two options

  • Console which means show the running guest console
  • Details which means show the settings

You can toggle between them.
You can change the settings for a guest VM at any time, they are not fixed when it is installed. It is best to change settings with the guest not running. If you change settings with the guest running, they do not apply until the next boot.

Default network settings

The guest VM is by default connected to the host system by a network bridge. If we look at the host network devices with the ip command we see

 $ ip addr 
 ..... 
 5: virbr0: <BROADCAST,MULTICAST,UP,LOWER_UP> mtu 1500 qdisc noqueue state UP group default qlen 1000
    link/ether 52:54:00:78:7c:5d brd ff:ff:ff:ff:ff:ff
    inet 192.168.122.1/24 brd 192.168.122.255 scope global virbr0
       valid_lft forever preferred_lft forever      

That device virbr0 is a virtual bridge between the host and guest systems. The guests under virt-manager ( there can be more than one) are on a virtual network with address 192.168.122.0. The bridge is address 192.168.122.1 on that network (as seen by the host). The host can route packets to that network via the bridge interface, in exactly the same way as it routes packets to an ethernet port or other interfaces.

To find the IP address of a guest on the above virtual network, one has to use the ip command in the guest.

  $ ip addr
1: lo: <LOOPBACK,UP,LOWER_UP> mtu 65536 qdisc noqueue state UNKNOWN group default qlen 1000
    link/loopback 00:00:00:00:00:00 brd 00:00:00:00:00:00
    inet 127.0.0.1/8 scope host lo
       valid_lft forever preferred_lft forever
    inet6 ::1/128 scope host 
       valid_lft forever preferred_lft forever
2: eth0: <BROADCAST,MULTICAST,UP,LOWER_UP> mtu 1500 qdisc fq_codel state UP group default qlen 1000
    link/ether 52:54:00:59:a0:69 brd ff:ff:ff:ff:ff:ff
    inet 192.168.122.45/24 brd 192.168.122.255 scope global dynamic noprefixroute eth0
       valid_lft 2932sec preferred_lft 2932sec
    inet6 fe80::994e:fcd3:91f3:6f30/64 scope link noprefixroute 
       valid_lft forever preferred_lft forever

We see 2 interfaces, lo which is the guest itself, and eth0 which is the guest’s interface to the virtual network. We can see now that our guest has IP address 192.168.122.45 on the virtual network.

We had to go into the guest to find its IP address, because virt-manager by default uses NAT (Network Address Translation) which means that one can not obtain the IP address of the guest from anywhere outside the guest.

One can operate virt-manager with just a bridge and no NAT. To do that got to View → Details → Add Hardware → Network and change the Network Source setting from Virtualnetwork default:NAT to Bridge Device. Without NAT, one can scan the virtual network from the host with a tool like nmap and find the guest IP addresses. That is about the only difference. We recommend using virt-manager with the default NAT setting.

From the host one can ping the guest using its IP number,
and one can ping the bridge using IP=192.168.122.1.

From the guest one can ping the host using either the hostname,
or the IP number of any of the hosts interfaces,
and one can ping the bridge using IP=192.168.122.1.
The guest does not know the host’s hostname, the name is
unresolved in the guest, but the ping packet is routed to the host where
it gets resolved.

Using hostnames

While one can communicate with a guest in virt-manager
using its IP address, it is more convenient to use hostnames. To do that we just need to set up hostnames in the file /etc/hosts
To achieve that , we need to add an entry to the file
/etc/hosts in the host system

$ cat /etc/hosts
# IP-number         Domain-name    Hostname
......
192.168.32.6		trinity.colrose.com.au	trinity
192.168.32.7		mary.colrose.com.au	mary
192.168.122.45      mxvm.colrose.com.au       mxvm

The entry mxvm is the hostname of the guest system.
The host system’s hostname is trinity and mary is another
computer on the local network.

With this setup one can do, from the host

$ ping mxvm
PING mxvm.colrose.com.au (192.168.122.45) 56(84) bytes of data.
64 bytes from mxvm.colrose.com.au (192.168.122.45): icmp_seq=1 ttl=64 time=0.199 ms

From the guest, one can always ping the host

$ ping trinity
PING trinity.colrose.com.au (192.168.32.6) 56(84) bytes of data.
64 bytes from trinity.colrose.com.au (192.168.32.6): icmp_seq=1 ttl=64 time=0.246 ms

because the guest will route the unresolved ping packed to the host
as explained above.
From the guest, one can also ping any other computer or
device on the local net ( such as mary), and any
internet site that the host can access.

We use ping here just to show that communication is established.
If ping is successful, we can proceed with data sharing.

Recommendation

When you setup virt-manager, get familiar with its virtual network.
Everything you do to share data between host and guest, or between multiple guests, depends on understanding the virtual network.

Links

https://gulraezgulshan.medium.com/virtual-networking-in-linux-b1abcb983e72

2 Likes

Sharing Data Between Host and Virtual Machine using Thunar and the ‘S’ commands (ssh,scp,sftp)

1. Introduction

Sharing a common folder or copying files between a host and virtual machine offers several benefits.

It allows for seamless data transfer, collaboration, and synchronization between the two systems. By sharing files or folders, both the host and virtual machine can access and modify files, thus enhancing productivity and convenience.

Here I put my focus on using the S commands

2. Using the scp command

One of the most commonly used and secure methods for file transfer in Linux is the scp (secure copy) command.
The following provides guidance on using scp to transfer files safely between the host and guest.

Before using scp for file transfer, ensure that the following prerequisites are met:

a. Both the host and guest machines should have SSH (Secure Shell) installed and properly configured.
b. SSH server should be running on the host and guest machines

1. Transferring Files from Host to Guest:

From a command line terminal in the host:

scp [options] source_file user@guest_ip:destination_directory

Replace [options] with any desired options, such as specifying a different port (see man pages for that).

Replace source_file with the path and filename of the file you want to transfer from the host.

Replace user with the username on the guest machine.

Replace guest_ip with the IP address or hostname of the guest machine.

Replace destination_directory with the directory path on the guest machine where you want to save the transferred file.

-r Recursively copy entire directories

example:

scp /home/rosika/Dokumente/shared_folder/test.txt rosika2@192.168.122.174:/home/rosika2/tests

2. Transferring Files from Guest to Host:

From a command line terminal in the guest:

scp [options] source_file user@host_ip:destination_directory

Replace [options] with any desired options.

Replace source_file with the path and filename of the file you want to transfer from the guest.

Replace user with the username on the host machine.

Replace host_ip with the IP address or hostname of the host machine.

Replace destination_directory with the directory path on the host machine where you want to save the transferred file.

example:

scp /home/rosika2/tests/test_in-other-direction.txt rosika@192.168.8.102:/home/rosika/Dokumente/shared_folder

Note:

Enter the SSH password for the host machine when prompted.

There may be requests like these:

the authenticity of host ‘192.168.8.102 (192.168.8.102)’ can’t be established.

ECDSA key fingerprint is SHA256: […]

Are you sure you want to continue connecting (yes/no)? yes

Warning: Permanently added ‘192.168.8.102’ (ECDSA) to the list of known hosts.

3. Using the file manager thunar for Sharing

Thunar, the file manager, which should already be installed on the host system, can also be utilized to access the virtual machine through SSH and perform file operations:

a) Launch Thunar on the host system

b) In the address bar, enter the following: ssh://username@virtual_machine_ip_address

(replace username with the username of the virtual machine and
replace virtual_machine_ip_address with the IP address of the virtual machine.)

You can get the IP address of the VM with ip a (from within the VM).

c) Authenticate by entering the password for the virtual machine when prompted.

d) Thunar will display the contents of the virtual machine’s file system, allowing file transfer and management between the host and virtual machine.

e) For convenience (and if used regularly) it might be a good idea to provide a bookmark to the VM in thunar.

f) Thunar lists the running VM under “network” in its left-side pane. It also has an eject button. It surely won´t hurt to “eject” the device when you don´t need the SSH connection anymore.

One can also use the ssh command directly at the command line in either host or guest, in the same manner as scp. This is of limited use. It allows you to browse files and to use copy/paste.

4. Sharing files and folders with the sftp command

In addition to scp, the sftp command can be used to establish an interactive file transfer session between the host and the virtual machine.
This allows for seamless transfer of files and folders using the secure FTP protocol:

a) Open a terminal on the host system

b) Connect to the virtual machine using sftp: sftp username@virtual_machine_ip_address

(replace username with the username of the virtual machine and
replace virtual_machine_ip_address with the IP address of the virtual machine.)

c) Enter the password for the virtual machine when prompted to establish the sftp connection.

d) Once connected, you can navigate the local host system using commands such as cd, ls, and pwd.
Use help to provide an overview of available commands.
Use bye or exit to quit sftp.

e ) To transfer files or folders from the host to the virtual machine (put command), use the following:

put /path/to/local/file_or_folder /path/to/remote/directory

put -r will be needed for folders (recursive put and get).

f) To transfer files or folders from the virtual machine to the host (get command), use the following :

get /path/to/remote/file_or_folder /path/to/local/directory

g) After executing the put or get command, sftp will initiate the file transfer between the systems. Progress will even be displayed in the terminal until the transfer is complete.

5. Recommendation

Use Thunar to drive SSH if you want a graphic interface to file sharing.
Use scp or sftp at the command line to copy files and folders between host and virtual machine. Use ssh at the command line if you just want to browse files or do copy/paste.

6. Links
2 Likes

Virtiofs filesystem mounts

The easiest way to mount a host filesystem in a guest VM is to use the virt-manager graphical interface.
Virt-manager provides two protocols for a shared filesystem, called virtiofs and virt9p. The former is considered superior.

The Linux mount statement normally mounts a device. What the virtiofs protocol provides is a means to pretend that a filesystem is a device (of type virtiofs), so that it can be mounted, by a normal mount statement.

Preparing virt-manager to do a virtiofs mount

Working in the host system:

  1. Open virt-manager and choose a guest system, so that it opens the QEMU/KVM window, but do not run the guest system

  2. Use the View tab, and choose Details

  3. Click on Memory and tick the option “Enable Shared Memory”.
    Click on Apply

  4. Clck on Add Hardware at the bottom left.
    A subwindow called “Add New Virtual Hardware” should appear.
    Select Filesystem from the left panel
    Select Driver = virtiofs
    Under Source Path enter the directory name in the host that you wish to mount in the guest
    Under Target Path enter an arbitrary tag-name. This option is confusing… it is not a path at all , it is an arbitrary tag used by the mount statement later on.
    Click on finish

Do the mount in the guest VM

  1. Run the guest VM

Working in the guest system:

  1. Make a mount point
mkdir /mnt/mymount
  1. Do the mount statement , using the mount-tag created in step 4 above
mount -t virtiofs mount-tag /mnt/mymount
  1. You can check it is there with df and examine the contents with
ls /mnt/mymount
  1. When finished , unmount it
umount /mnt/mymount

Recommendation

Use a virtiofs mount if you want to work in the guest on a host filesystem and prefer a graphic interface.
It is not possible to put a virtiofs mount in /etc/fstab in the guest system. You have to remount it every time you boot the guest system.
Correction:
That last sentence is wrong. It is possible to setup a permanent virtiofs mount in the guest system .
See Reply #44 in this topic.

Links

2 Likes

NFS mount of a host filesystem to a guest mountpoint

NFS stands for Network File System. It is one of the oldest
and most reliable ways of sharing files between machines
on a network.
It works just as well on a virtual network, as on a
physical network.

Setting up the host to share a filesystem

The host system must have the NFS server daemon (commonly called nfsd) running
for NFS to be able to export a host directory to the guest system.
Exporting consists of making a directory available to be mounted by
the guest system.

In a Debian host, or a derivative, the NFS server package is ‘nfs-kernel-server’
and the client packages are ‘nfs-common’, ‘libnfs13’,
and ‘libnfsidmap2’.
Installing ‘nfs-kernel-server’ with apt should automatically
start the server daemon.

In an Ubuntu host, or a derivative,…

In a Void Linux host NFS requires the
package nfs-utils and one should check that the
service nfs-server is running

[nevj@trinity ~]$ ps ax | grep nfs
 1052 ?        Ss     0:00 runsv nfs-server
 1318 ?        I<     0:00 [nfsiod]
 1549 ?        S      0:00 [nfsd]

and it also requires that the services statd, rcpbind’
and ‘netmount’ are running. In Void Linux these may have to be
started by hand.

To share a filesystem it has to be listed in the file
/etc/exports as follows

/common   192.168.122.45(rw,no_subtree_check,no_root_squash)

will allow the directory /common in the host
to be mounted by the VM guest at 192.168.122.45
Changes to /etc/exports have to be followed by

exportfs -a

You only need to do exportfs -a once, it is permanent.
You can check that it has worked by

showmount -e localhost
Export list for localhost:
/common 192.168.122.45

Setting up the guest to do an NFS mount

To do an nfs mount in the guest, one should first check
that nfs is installed, and that the nfs client
(called nfsiod) is running.

ps ax | grep nfs
   1327 ?        I<     0:00 [nfsiod]
   2983 pts/0    S+     0:00 grep nfs

That is OK so we can do a mount

mount -t nfs 192.168.32.6:/common /mnt/common

df -H
Filesystem            Size  Used Avail Use% Mounted o.....
......
192.168.32.6:/common  1.2T  111G  975G  11% /mnt/common

That is all that is needed.
The IP address used in the above example can be any
interface available in the host. In my case there was a choice of

  • the static port 192.168.32.6
  • the DHCP port used for internet connection
  • the virtual bridge port virbr0 which is 192.168.122.1

They all work.
If one configures /etc/hosts in the guest,
one can use the hostname instead of IP address.
DNS is not required.
So NFS is different from ssh in that it listens
on all interfaces. Ssh is commonly restricted to
not listen to the internet port.

If you require an nfs mount every time you start the guest VM,
put the following in /etc/fstab

192.168.32.6:/common /mnt/common nfs rw,hard 0 0

Reverse option

It would be possible to configure a VM guest system as
an NFS server and to make the host act as a client. This
would make a guest filesystem mountable by the host.
This backwards-sharing may be less useful and it does not
correspond to what is commonly meant by a shared folder.

Recommendation

Use NFS mounts if you want what is commonly called
a shared folder. That is to share large amounts
of data between host and guest systems.
Use nfs mounts if you want the mount to be made
automatically every time you start the guest VM.

Links

https://docs.voidlinux.org/config/network-filesystems.html

2 Likes

Using qemu-nbd to mount a filesystems within a qcow2 file

Virt-manager stores images of its virtual machines at the location
/var/lib/libvirt/images by default.
Most users would prefer a separate partition or a directory within
one’s home directory.
For example I have a separate partition

$ df
Filesystem      1K-blocks      Used Available Use% Mounted on
/dev/sdb14      329584540  26947832 285821604   9% /qemuvm

So I make /var/lib/libvirt/images a link

$ pwd
/var/lib/libvirt
$ ls -l
lrwxrwxrwx 1 root root       7 Jun  6 17:47 images -> /qemuvm

Inside /var/lib/libvirt/images one normally finds .qcow2 files

$ ls images
MXahs.qcow2  debian.qcow2  lost+found

qcow2 is the default image file format used by virt-manager.

Inside those .qcow2 files are images of the guest VM’s
filesystem. It is possible to mount those filesystems buried within the .qcow2 file
using the qemu-nbd command.

The ndb stands for Network Block Device, a protocol used
for accessing disks or partitions across a network.
The program qemu-nbd comes in the package qemu-utils in Debian and Ubuntu.

Using qemu-nbd to mount a qcow2 disk image

There are 4 steps

1 . load the nbd kermnel module

# modprobe nbd max_part=8

2 . mount the qcow2 disk image

# qemu-nbd -c /dev/nbd0 --read-only /var/lib/libvirt/images/MXahs.qcow2

This makes a device /dev/nbd0

3 . List the partitions within the nbd device

 # fdisk -l /dev/nbd0
Disk /dev/nbd0: 25 GiB, 26843545600 bytes, 52428800 sectors
Units: sectors of 1 * 512 = 512 bytes
Sector size (logical/physical): 512 bytes / 512 bytes
I/O size (minimum/optimal): 512 bytes / 512 bytes
Disklabel type: dos
Disk identifier: 0xe1b0ab5a

Device      Boot    Start      End  Sectors  Size Id Type
/dev/nbd0p1 *        2048 49793023 49790976 23.7G 83 Linux
/dev/nbd0p2      49793024 52414463  2621440  1.3G 83 Linux

4 . Mount the required partition, in this case /dev/nbd0p1 is
the Linux partition

# mount /dev/nbd0p1 /mnt/mxahs
mount: /mnt/mxahs: WARNING: source write-protected, mounted read-only.`

It only allows a read-only mount because we specified read-only in step 2
We can now look at the MXahs filesysten

# ls /mnt/mxahs
bin   dev  home  lib64	 lost+found  mnt  proc	 root  sbin  tmp  var
boot  etc  lib	 libx32  media	     opt  pulse  run   sys   usr

We see the MXahs root filesystem

5 . Cleanup

Unmount the filesystem

umount /mnt/mxahs

Disconnect thee nbd device

qemu-nbd --disconnect /dev/nbd0

Remove the module

rmmod nbd

Warning

One should only do this when the guest is not running, particularly if the mount is in rw mode.
Writing on a running guest filesystem can cause irreversible
damage to the qcow2 file.

Recommendation

A qemu-nbd mount is useful if you have done something
mistaken to the guests filesystem ( eg editing /etc/fstab)
and it will not boot.
One can mount the qcow2 file in rw mode and repair the guest filesystem so it will
boot. One needs to do this with due care, heeding the warning above.

It may also occasionally be useful to do a qemu-nbd mount in read only mode
in order to transfer files to or from the host, but there are other
ways of doing that.

LInks

https://www.qemu.org/docs/master/tools/qemu-nbd.html

2 Likes

Device mounts

Virt-manager can make host devices (such as a hard disk partition) directly available to a guest VM.

A word of caution is necessary here.
If the host and guest access the same disk partition with
write permission, data corruption can occur.

It is recommended that you only make available to a guest disk partitions that are not mounted by the host.

The steps are:

Find the physical disk partition you want to add to virt-manager

We need the actual id-name of the disk partition.

$ ls -l /dev/disk/by-id/
total 0
lrwxrwxrwx 1 root root  9 Jun 28 20:32 ata-ST2000DM001-9YN164_S2408NP5 -> ../../sda
lrwxrwxrwx 1 root root 10 Jun 28 20:32 ata-ST2000DM001-9YN164_S2408NP5-part1 -> ../../sda1
.....
lrwxrwxrwx 1 root root 10 Jun 28 20:32 ata-ST2000DM001-9YN164_S2408NP5-part3 -> ../../sda3
....

As an example we are going to use partition sda3
which has the name LinuxHome1 and contains
the home directory for another Linux which is not
the host, and is not mounted to the host.

Add this partition to the guest VM using virt-manager

On the QEMU/KVM screen select View → Details → Add Hardware
In the Add Hardware submenu choose Select or create custom storage.

Then next to Manage… enter the partition name
/dev/disk/by-id/ata-ST2000DM001-9YN164_S2408NP5-part3 -> ../../sda3
and set Bus type to SATA.
and Finish

An entry SATA DISK 1 should now appear in the Details menu

Mount the added device in the guest system

Run the guest VM.
Identify the partition name used by the guest for our added partition

# blkid
/dev/vda1: LABEL="rootMX21" UUID="a9db9817-7d2f-43f2-811b-21c808e38a79" BLOCK_SIZE="4096" TYPE="ext4" PARTUUID="e1b0ab5a-01"
/dev/vda2: LABEL="swapMX" UUID="f38db7a9-6c8b-4bcc-8475-459eb4ef95f7" TYPE="swap" PARTUUID="e1b0ab5a-02"
/dev/sda: LABEL="LinuxHome1" UUID="895f2f7d-978f-499e-b958-cba663f88121" BLOCK_SIZE="4096" TYPE="ext4"

So in this case our “LinuxHome1” is called /dev/sda in the guest.

Make a mount point
mkdir /mnt/partmnt

Mount it

# mount /dev/sda /mnt/partmnt

# df
Filesystem       1K-blocks      Used Available Use% Mounted on
udev               4950644         0   4950644   0% /dev
tmpfs              1002028      1000   1001028   1% /run
/dev/vda1         24328544   7879712  15187676  35% /
tmpfs                 5120         8      5112   1% /run/lock
tmpfs              2266180         0   2266180   0% /dev/shm
cgroup                  12         0        12   0% /sys/fs/cgroup
tmpfs              1002024         4   1002020   1% /run/user/115
tmpfs              1002024        12   1002012   1% /run/user/1000
/dev/sda         201390520  22538472 168595836  12% /mnt/partmnt

It is now mounted.
Can we read it


# ls /mnt/partmnt
lost+found  nevj

OK , there is my home directory.
Finish up

umount /mnt/partmnt

Recommendation

Use a device mount only if you really need to mount a whole partition or device. Otherwise filesystem mounts ( virtiofs or nfs) are safer.

Links

2 Likes

Using rsync to share files between guest and host

The comand rsync is useful for keeping the contents of 2 directories
exactly the same.The 2 directories can be on separate
physical machines on a network, or one or both of them can be on
virtual machines on a virtual network.

rsync will work over any network which is setup for ssh
usage.

Example from guest to host

We have a directory called Test in a guest MX system containing
some markdown files

nevj@mx:~/Test
$ ls
devicemount.md  kgw_2project.md  nfsmount.md.v1  rsync.md  virtiofsmount.md
intro.md        nfsmount.md      qemunbd.md      ssh.md    virtmannet.md

We want to maintain an exact copy of the contents of that
directory in the host system. This requires issuing an rsync command in the guest


 nevj@mx:~/Test
$ rsync -aAXvH /home/nevj/Test/* trinity:/home/nevj/Test
The authenticity of host 'trinity (192.168.32.6)' can't be established.
ECDSA key fingerprint is SHA256:xxxxxxxxxxxx.
Are you sure you want to continue connecting (yes/no/[fingerprint])? yes
Failed to add the host to the list of known hosts (/home/nevj/.ssh/known_hosts).
nevj@trinity's password: 
sending incremental file list
devicemount.md
intro.md
kgw_2project.md
nfsmount.md
nfsmount.md.v1
qemunbd.md
rsync.md
ssh.md
virtiofsmount.md
virtmannet.md

sent 19,642 bytes  received 210 bytes  2,335.53 bytes/sec
total size is 18,933  speedup is 0.95
nevj@mx:~/Test

Any file that is not already present in trinity:/home/nevj/Test
is sent by rsync ( in this case all of them ).
Either the hostname (trinity) or alternatively
the IP address can be used in the rsync statement.

Rsync from host to guest

This is done in exactly the same way, except the rsync
command is issued in the host.
In this case, if the hostname of the guest is used, it has to be defined
in the /etc/hosts file of the host.

Recommendation

Use rsync if you want to keep a very active directory
updated in both host and guest.

Links

2 Likes

Accreditation:
Only one person can make a topic. It fell to me.
This topic is a collaborative effort between @Rosika and myself.

3 Likes

Their is a lot of info in that topic, I think I will transfer files using the one command to mount the shared folder or just use my USB device.
You two have been working overtime on this topic!!! GOOD WORK!!!

3 Likes

Yes it took us a while. Everything is tested.
If you want the raw markdown files they are here

1 Like

If you mount a device in the guest, do not have it mounted in the host at the same time.
It can cause file corruption.
Read the warning message in the Device Mounts section.

1 Like

That is why one uses the redirect in the VM, it unmounts from host and mounts it in the VM.
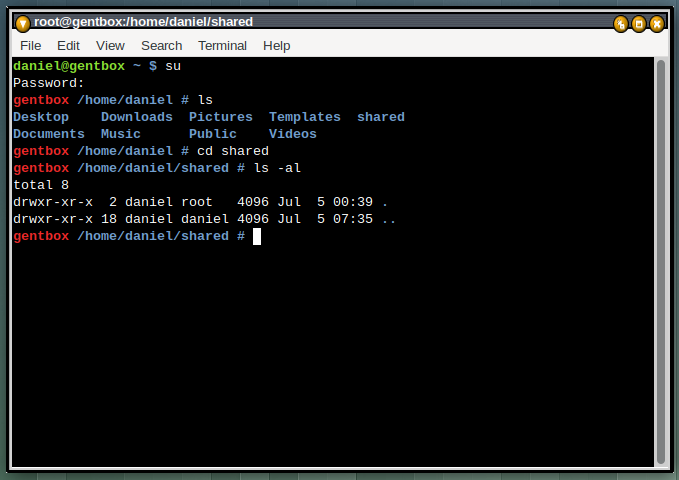
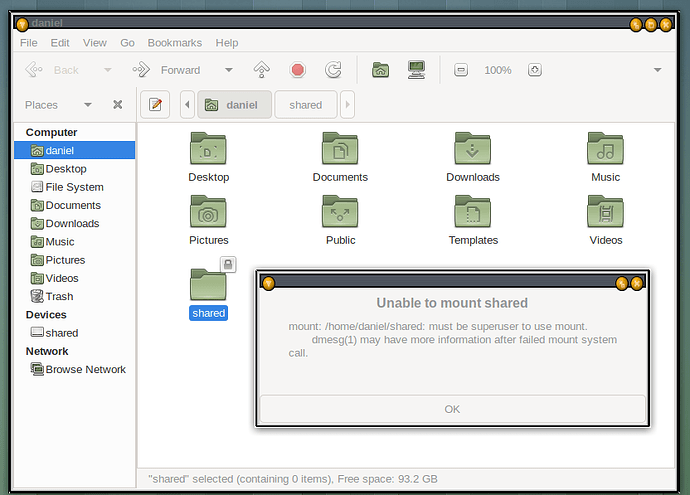
How does one gain superuser privilege, when mounting a folder?

I dont know what redirect is?

You just use su in the guest


What does this mean?

Thats a file manager screenshot.
It means the folder “shared” is owned by root and has permissions set to owner only
Change the permissions of “shared” to rwxrwxrwx, or change its owner to Daniel

You can do a user mount in the file manager, but if you use a mount statement you must be su.

BTW, you dont have to have a special shared folder.
You can just mount any host folder you want to work on in the guest.

Under the Virtual Machine tab “redirect usb device” a usb must be plugged in

Oh, I see, I have not been in there.
So it has inbuilt protection… that is nice.
virt-manager has some good points… there are certainly lots of buttons in the Details section. You can change any of the settings, without having to reinstall the guest.

Screenshot from 2023-07-05 07-50-57

Go up one level and redo ls -l
I want to see the shared directory, not its contents

Is daniel in the root group?