Installing Debian On My Dell Laptop

The past few days I have been upgrading my old Dell Inspiron 15
laptop The first thing I did was too pull the spinner drive and replace
it with SanDisk 250GB SSD, this alone has brought the old Dell alive again!!
The next step was to install W10 Pro and use a W7 product key to activate,
worked really well. Now I know W10 is as far as this little laptop, can legally,
go with Windows, but I also have a couple of more years of W10 left, and I will
use the time I have left. I also realize, that it would not hurt, to give W10 some
help, using Linux. And the drama starts!!!


The first I needed for Windows was s a more, robust partition manager, than Windows Disk
Management. Aomei Partition Master Free works quite well

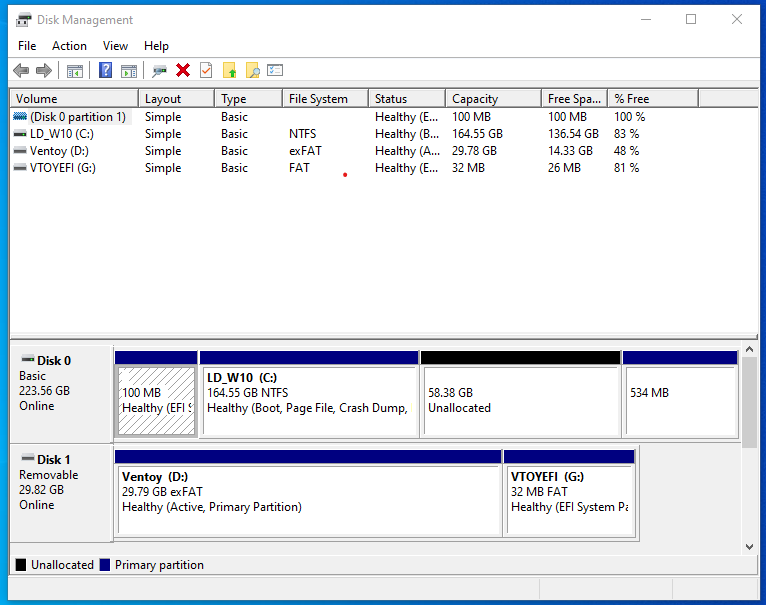
After downloading and installing Aomei, this is what I used it for. This disk is GPT with UEFI boot W10 installs with a #1 efi partition, #2 system reserve partition (unformatted), #3 a C: partition (for Windows) and #4 a recovery partition. Now W10 will boot without the recovery partition, but it does not like too, and it is not wise to remove the partition. Now, if Windows is installed and all the disk is not used, then that
recovery partition will end up right behind the C: partition, and in order to get the disk
space needed for Debian, it has to be moved to the very last partition on the disk.
Forget about Disk Management, it will not move it, but Aomei moves it very well.

Now the real fun starts!!! If I were using legacy boot I could install EasyBCD in Windows and use Windows to boot Linux, but EasyBCD does not support UEFI.
So, we have to use Grub to boot Windows.
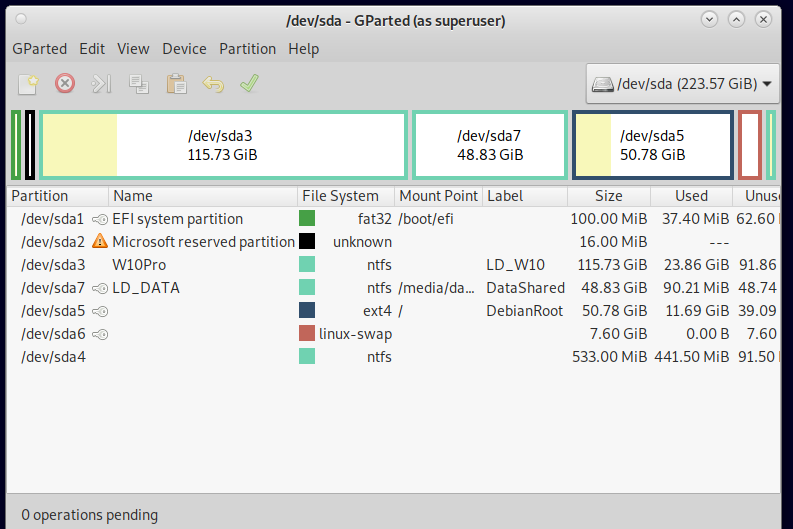
I have gparted and Debian on my Ventoy USB device, so I boot into gparted and do my partitions After I create my partitions I boot into Debian and use the installer to assign mount points and let the installer run.
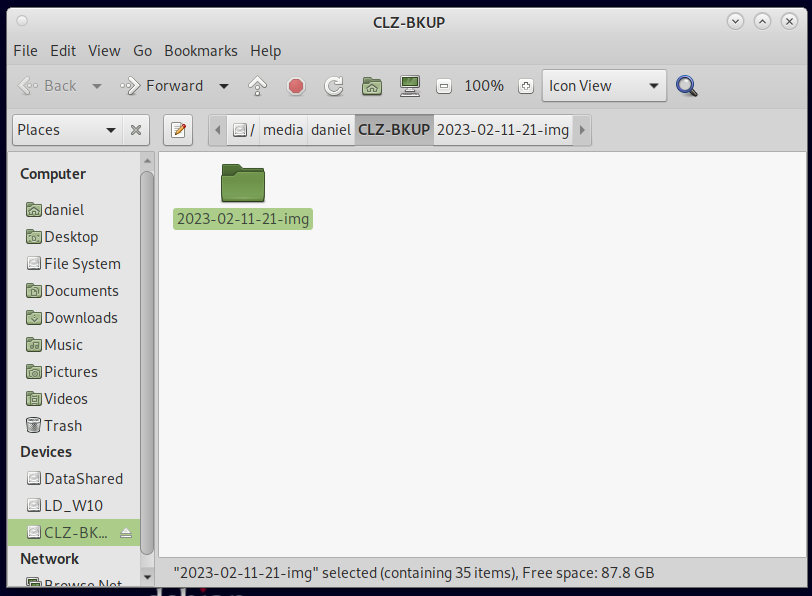
The /dev/sda7 was created to share data from Windows to Debian.
Why did I choose Debian? In one word “stability”


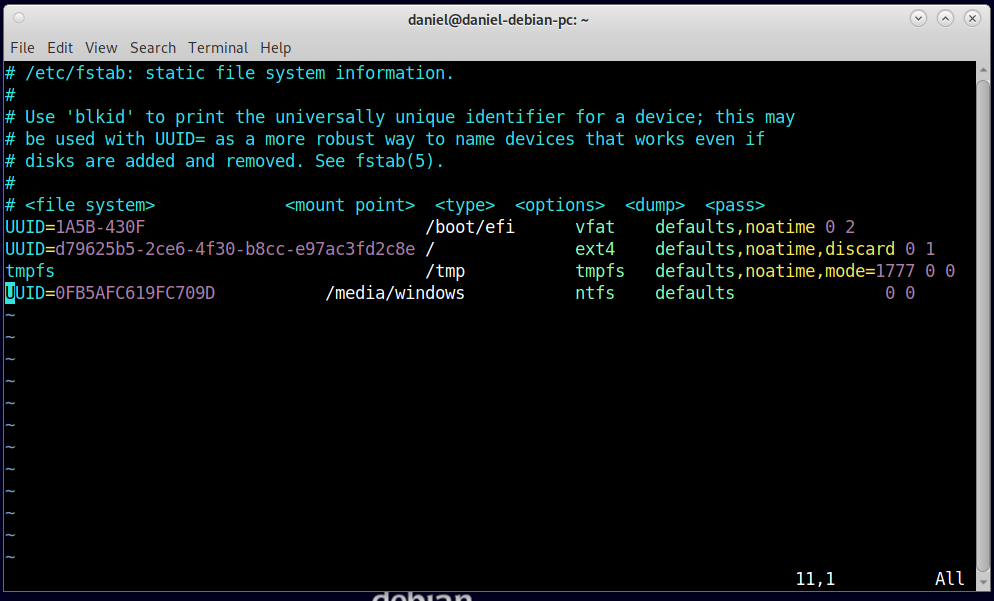
Finally got around mounting the data partition in fstab. Had to login to W10 and
rename the partition /media/windows and then log back into Debian and edit
with nano /etc/fstab, I now have read and write with Debian.

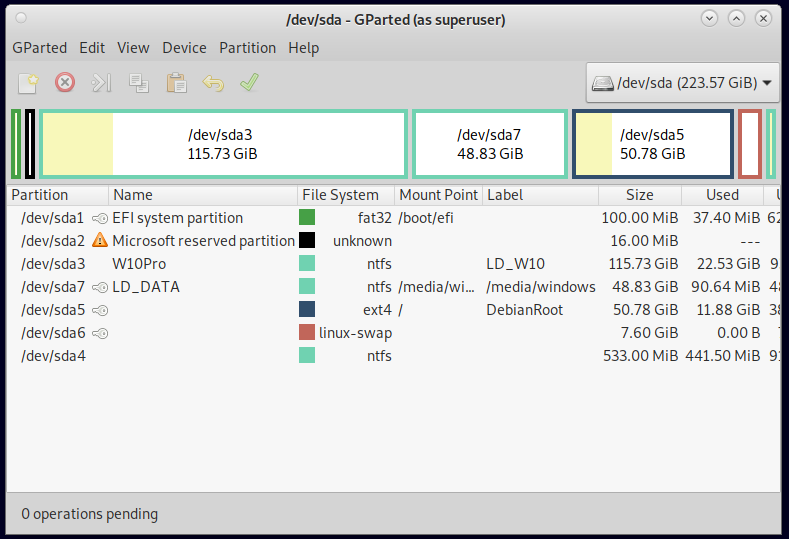
My disk now looks like this, mount point has changed for the data partition.

@4dandl4
So does it boot? Did os-prober find windows?
Can Debian write on the NTFS partition?
I guess you will never update W10, so it will not interfere with grub.

There is another way of doing it. You can leave NTLDR there to boot W10 with ,and make it chainload to grub to get Debian…
Forget the details, I did it 15 years ago.

Like a charm!!!

Debian and Windows can write to NTFS, Windows cannot write to ext4.
I can mount W10 partition but have permission issues with W10 user
folder.

That is why you need to share your knowledge of using Clonezilla
for bkups!!!

W10 does not use NTLDR to boot, it uses BCDBOOT with Windows Boot Manager.

Do you think there is a need for a Clonezilla getting started article.?
Perhaps we should approach management
There have been Clonezilla discussions

If Clonezilla would bkup the entire drive to an external drive I would be very interested!!!

It will do that.
Do you want to image the drive, ie make compressed backup image
or clone it, ie make an exact copy, like you would get using dd

It can do either… you just choose
disk-disk for a clone
disk-image for an image

Obviously for a clone, the external target disk has to be at least as big as the internal source disk
I have never done a clone… people use it when replacing a disk.

For backup, you use an image. You can recover any partition, or all of it. It backs up the mbr or the efi partition and the partition table… everything.

I want to make bakup image that can be updated from time to time
or disk-image

This is what I need. I have used Clonezilla, but always in the clone-mode never in disk-image-mode.
How does the external drive have to be formatted? Are you running Clonezilla from a cd or usb?

If possible, another SSD would be nice. 250G is pretty tiny for Windows 10 alone, let alone with a Linux and swap partition.

Thanks, but that will not happen. The 250GB SanDisk is what I had and there is plenty of disk
space for everything to run.

Format the external drive to ext4… I use just one big partition, but you can partition it if you want.
Use the disk-image option
Use the savedisk option to do the whole disk… that is what I normally do
If you want a quick backup of just one partition use the saveparts option instead of savedisk… that is like timeshift.

There is no updating.
When you want a new backup just do the whole thing again to a new image file
When you get too many image files, delete the oldest.
Be careful naming your image files

Download the latest 64bit Clonezilla
If you computer will boot a usb, copy the iso to a flash drive with dd… you dont need Ventoy or anything fancy it is a bootable iso.

1 Like

I already have the iso!!!
OK, my biggest concern here is that Windows may overwrite Grub via Windows updates,
I cannot stop Windows updates but I do know that Windows would only do this doing a feature update
update or reinstalling Windows. Can grub be recovered using either rescatux or with super_grub 2? I have a 500GB WD spinner drive, that is doing nothing, can it be put to use, using a cady and usb hook-up?

Clonezilla will recover grub.
As long as you do savedisk it will save and recover EVERYTHING on that disk, including grub.

The reason it doesnt do updates is they can corrupt the image. Clonezilka checks the image when it makes it, then you leave it alone unless you need a recovery. Nothing short of a house fire will destroy it.
If you want an updated backup, make another image file.

very simple. Thats how you keep it safe.


I did it my 1st Clonezilla image bkup!!!

1 Like

Great,
That is a directory… look inside it. You will see all the partitions, and other things including lots of info about your disk
You can recover one partition or everything.

Yes I do. It seems too difficult for someone who needs that sort of thing only occasionally. The other day I had to do something less complicated than @4dandl4 described, and switched to the version of Acronis that’s free from Crucial (I was using one of their disks).

1 Like

There is a Linux Magazine article

but
there does not seem to be FOSS introductory article

@nevj
Since you are more familiar with Clonzilla is there anything that you would add to that article,
I’m about to save link pages x3 as pdf.

I will have to read it closely.
I would probably abbreviate it… long waffles are not helpful… You just want the ‘recipe’ for your cake, not the whole cookbook.

@artytux ,
I read it agaIn.
Its OK for backup and restore. All the steps are there.
It is brief about cloning. I have never used it to clone a disk, that is rarely done.

My comment to you would be… as you use it write down every step. You will end up with a ‘cheatsheet’ with one page of instructions. That is what I do, then I just follow the same steps next time.
The article is fine for a first try, but you will get sick of reading it. Develop your own prompt sheet.

Traps

  • run out of space on backup disk… check it first
  • not name images carefully… cant remember what system they backup
  • partitions on backup disk … cant remember which one to use for /home/partimage
  • it uses device names (sda, sdb,…) … be careful with more than one disk, it can reorder them
  • there is no going back in the menus… if you muck up start again

Trivia

  • it says ext3… but ext4 or ext2 are OK
  • I dont like zip files. Its a bootable .iso, you can just dd it to a flashdrive
  • It works faster off a usb drive than a CD, but your machine must be able to boot from usb devices.
  • 32bit is a separate version of clonezilla, as are different architectures
1 Like

@nevj

Thanks for taking the time to read it and posting your advice,
Saving this page to pdf will go into the clonzilla folder.