I experienced some weird situations with two of my notebooks.
I installed Linux Mint 19 and activated encryption of the whole system on setup.
This worked out just fine for some time.
In the last days, or after several updates, I get warnings of insufficient space on /boot, so I can’t do any updates as a result. I tried to expand the specific partition with gparted, but the tool could’nt do it (reason: unknown to me) I booted live, and decrypted the partition, but was not able to resize.
I wonder, if anybody here has similar problems.
I thought, Mint install would take care to use sufficient space for it’s partitions.
This situation is very confusing/frustrating for new users.
Or maybe I missed something and it’s a typical PEBCAC…
If you chose the full auto encryption method (LEGACY method), there should be two partitions. One primary (/boot, as this should not be encrypted ) and one logical volume with sub partitions, allowing these sub-partitions to expand, through use, essentially limited to the / and /home only.
/boot a primary partition of 250MB or 500MB in size.
One logical volume, which has two sub partitions of / (root) and /home (home).
It would be a good idea to check if you have an UN-encrypted boot partition in ext2.
Then
I have found occasionally, if installed in UEFI. The installer formats /esp (32bit MDOS), no separate ext2 /boot, and the logical volume partition that takes up the rest of the disk. If this has happened, you have been very lucky for it to survive this long.
If you installed in UEFI, there should be x3 partitions of /esp, /boot, logical volume with / and /home contained within.
It will be prudent to back up all your data to an external disk before applying any further remedies.
Hello.
Thanks for your reply.
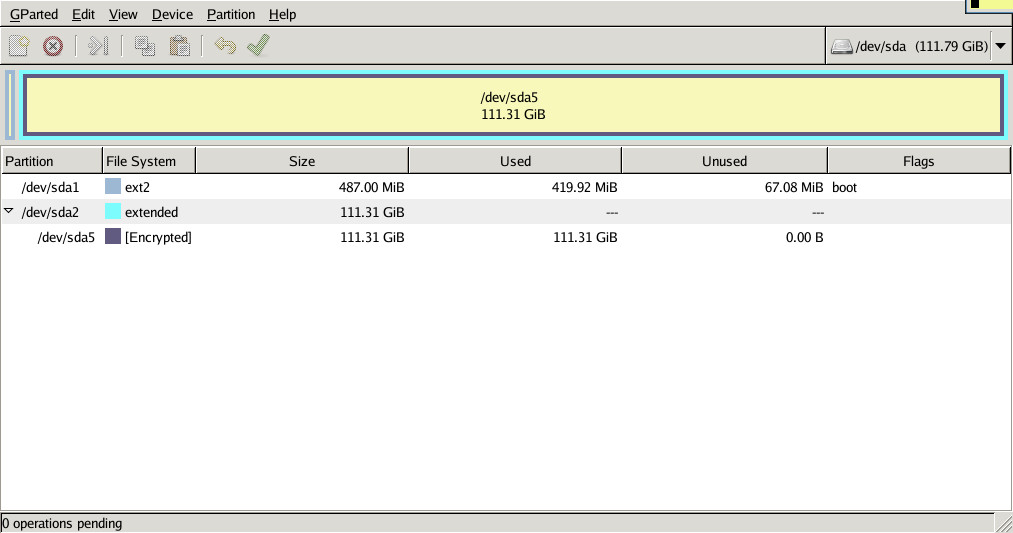
There’s an unencrypted ext2, as you sayd (see screenshot)
The Notebooks have no UEFI BIOS, so this was installed “normally”.
The question is: How can I resize the boot partition?
Or is there no way to do so?
As it happens, I haven’t done this much with those notebooks yet, so re-installing won’t be a problem.
But I’m curious how this could happen…
That’s exactly the reason I never let installations “auto” things, especially not partitions. The way it is partitionend, you have no choice but to reformat the hard drive to do it properly. If I had to partition this HDD myself, I would create the extended primary partition for the whole HDD and then add every other partition within the extended one.
The reason I ask about how you had configured the HDD would help qualify my answer.
The auto install has given you x1 primary /boot partition of 500MB and a logical volume partition that takes up the whole HDD.
What concerned me, was, you stated you had an error message after a recent update, you had insufficient space on /boot.
Plus you were running Linuxmint 19. This distro has a single fixed or pinned kernel stored in the /boot partition to boot up your laptops. Usually before any maintenance needs to be carried out, you could have stored three or four kernels in this sized /boot partition.
You have NO need to expand this /boot partition.
This could suggest the boot is or has become corrupted. Run these commands in the terminal as root.
sudo apt autoclean && sudo apt autoremove
dpkg --configure -a
sudo apt clean
When it runs the autoclean and autoremove command, it should ask you confirm with Y/n. Before typing Y. Scroll back and look to see what it is removing, i.e old kernels, there should not be any.
Yes, I got this message on both notebooks recently.
Before I follow your suggestions, I’ll try to reproduce the message by performing an update and then posting it here.
That may be tomorrow, for I’m afk for the next couple of hours…
Have a good night.
@Fast.Edi, was the update you did a kernel update? Mint stores kernel files in /boot and they are not removed when you do a kernel update. This eventually will fill your boot partition. Since mint is ubuntu based, you can follow the steps described in the link below to safely clean up your boot partition.
Thanks for the correction, it has been a while since I’ve run LM, though it was a fully encrypted installation for about 18 months some time ago, without the need to purge older kernels. Which I had to do on a regular basis when using other Ubuntu derivatives.
Terminal command:
dpkg --list | grep linux-image (this lists all kernels installed. Current kernel i.e 4.15.xx)
Once you have the detailed kernel info after using the “dpkg --list | grep linux-image” command, you will need to modify the above code to purge the older kernels.
Edit
Here is the link for the dedicated Linuxmint site which goes into their preferred method.
Hello, @anon56357095 and @dandan02.0403
Thanks for our advices.
I can remember a few years ago, but forgot about it…
There has been freed about 1gig of space…
I kept the actual kernel and the one before as a fallback.
There are some kernel files named “linux-image-extra-x.xx.x-x-generic”
Is it save to remove them too? A quick search revealed unclear suggestions…
I discovered another method for this “kernel issue” in an old wiki of mine…
There is a package called “byobu” (Ubuntu as of 16.04 and Mint as of 18), which contains the command “purge-old-kernels”.
It is installable via sudo apt install byobu
For Ubuntu pre 16.04 or Linux Mint 17.x you can use sudo apt install bikeshed
When installed, you can use sudo purge-old-kernels
to get rid of the, well, old kernels…
purge-old-kernels never removes the running kernel.
It keeps the two last kernels as a default, too.
This can be controlled with the parameter “–keep” purge-old-kernels --keep 1
leaves only one kernel on the system.