Shrinking Primary Partition Issues (Using TRIM on NVMe) & Installing BTRFS Distro Alongside MX Linux

I am working a project where on my laptop I want to repartition my 1 TB NVMe SSD and utilize those new partitions to try out some noted “gaming” distros and see how they compare.

I have MX Linux as my daily driver and do not want to change that. But since the laptop has both integrated Intel Iris Xe Graphics and Nvidia RTX 3050 Ti, I use it extensively for my casual gaming needs. While there are a few hiccups with my gaming, they are nothing that limits my ability to play most of my games, older Windows games, notwithstanding.

But reading up on the distros out there that might be better suited for gaming, I want to test those out (not in a VM, obviously) on their own partitions on this laptop and see how they compare to MX Linux.

My first step was to make a Clonezilla image as backup and that was a very good thing.

Second step was to reduce the size of the current partition from using the full disk space to what I thought would be acceptable. I had a current usage of 114 GB and so figured surely 200 GB would be enough to ensure there would not be any data loss. (More on that later).

Third, I created 4 100 GB partitions to install each of the other distros. One of which I did not know at the time, later discovered, used the BTRFS system and would then not be discovered in my controlling GRUB on MX Linux.

I installed 3 that I wanted to test and scrapped the fourth once I saw the installer. Not only did Chimera OS not have a live option, but I had not seen such an archaic installer since perhaps my DOS days…LOL.

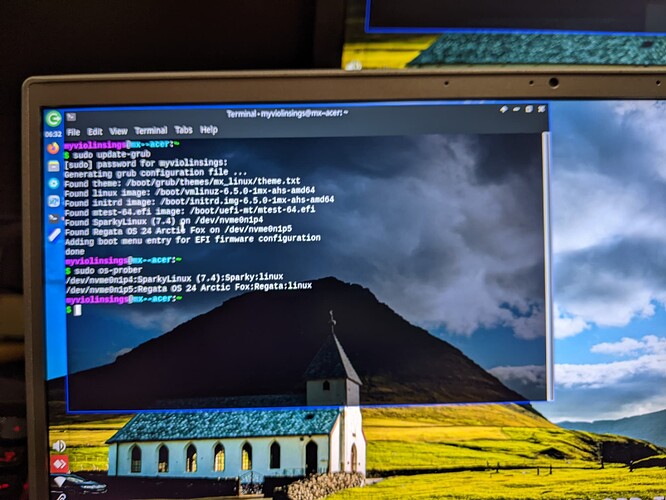
Of course, after each install, I rebooted into MX Linux and ran update-grub and it found each except Garuda, which I discovered was a BTRFS and I guess having never used such a distro, did not know that you would be required to install it standalone first and then any other distros. Which I assume would then mean using it’s own menu to boot to the others. Not sure I am interested in that, yet, but will deal with that later.

Now each time I installed a new distro on the next partition and rebooted to MX Linux, I did not notice any issues, until the last one. That is when I noticed that only one workspace existed (previously, I had 5) and it showed up only as “Workspace 1” even though the info on the workspace had retained my given label of “ItsFOSS & Browser.” This is where I do all of my research and testing out the ItsFOSS article recommendations. Okay, so no big deal on that issue. Could always recreate other workspaces.

But on the final reboot into MX Linux, opening terminal planted that window in the uppermost left of my screen and covered the panel that resides vertically left on the desktop. Not only could I not get “right click” to produce the normal menu to move, resize, etc. it seemed the system was frozen for a bit after loading the desktop. I would start to type a command and notice nothing was displayed. I tested my keyboard, display settings, even workspace settings which allow for a margin so that open windows never cover the left side panel. Nothing changed.

After a minute, I could type in terminal. But it was buggy. Each open window was lying atop every other window and there was no way to acces any of the hidden ones without using task manager to terminate each and every one, including task manager itself.

Well something was definitely wrong, so I figured I had experienced some data loss in shrinking the original partition from 950 GB down to 200 GB. So I restored my Clonezilla image and all was well again.

But recently I had opted on my home server (which only has the integrated AMD graphics) to test out some other distros and had installed them after partitioning it’s NVMe drive without any issues to my Debian Bookworm distro I use for it (of course very little is on that SSD as it is only used for server admin stuff). But when I did my first CLI update in PeppermintOS Devuan, I noticed something I had not seen on any of my other Linux distros: I was asked if I wanted to “Trim” the SSD.

I thought, I did not even know that was a thing in Linux! And of course the logic to me was that it maybe worked like defrag in Windows? It would ensure all that data on the drive was not written all over the place, keeping the disk space usage nice and tidy, no?

So once I encountered all these issues on the MX Linux drive, I thought maybe this time I should look at doing the TRIM on that drive first, then make an image for restorability, and try again to shrink MX partition and add the others.

My research revealed a lot of related commands I did not know and having never used the smartmontools before, I delved into how that could help me achieve my goals.

I ran
sudo fstrim -av on the 1 TB NVMe disk with the following results:

  1. EFI is so small it happened instantly: 251.8 MB of a 300 MB partition
  2. Main partition trimmed 819.5 GB

Further research showed that Ubuntu (SystemD) has a service for this tool but checking my service manager in MX, there is no such service. Which is fine, I can add one, but also run it manually. However, most articles recommended doing that daily when you use it as much as I do.

And as I understand it better now:

Use of the TRIM command helps to optimize the capacity of an SSD by allowing garbage collection and background processes to ignore the invalid or obsolete data. The end result is faster data writes and reduced drive wear.

So I looked at the syslog and a few key lines seemed important, but I was unsure:

2024-07-04T06:26:38.809282-04:00 mx--acer smartd[2283]: Device: /dev/nvme0, number of Error Log entries increased from 142 to 164
2024-07-04T06:26:38.809311-04:00 mx--acer smartd[2283]: Sending warning via /usr/share/smartmontools/smartd-runner to root ...

Here is my smartctl data:

=== START OF INFORMATION SECTION ===
Model Number: Samsung SSD 970 EVO Plus 1TB
Serial Number: S59ANM0W555364V
Firmware Version: 2B2QEXM7
PCI Vendor/Subsystem ID: 0x144d
IEEE OUI Identifier: 0x002538
Total NVM Capacity: 1,000,204,886,016 [1.00 TB]
Unallocated NVM Capacity: 0
Controller ID: 4
NVMe Version: 1.3
Number of Namespaces: 1
Namespace 1 Size/Capacity: 1,000,204,886,016 [1.00 TB]
Namespace 1 Utilization: 119,916,183,552 [119 GB]
Namespace 1 Formatted LBA Size: 512
Namespace 1 IEEE EUI-64: 002538 553191cdcb
Local Time is: Thu Jul 4 07:00:50 2024 EDT
Firmware Updates (0x16): 3 Slots, no Reset required
Optional Admin Commands (0x0017): Security Format Frmw_DL Self_Test
Optional NVM Commands (0x005f): Comp Wr_Unc DS_Mngmt Wr_Zero Sav/Sel_Feat Timestmp
Log Page Attributes (0x03): S/H_per_NS Cmd_Eff_Lg
Maximum Data Transfer Size: 512 Pages
Warning Comp. Temp. Threshold: 85 Celsius
Critical Comp. Temp. Threshold: 85 Celsius

Supported Power States
St Op Max Active Idle RL RT WL WT Ent_Lat Ex_Lat
0 + 7.80W - - 0 0 0 0 0 0
1 + 6.00W - - 1 1 1 1 0 0
2 + 3.40W - - 2 2 2 2 0 0
3 - 0.0700W - - 3 3 3 3 210 1200
4 - 0.0100W - - 4 4 4 4 2000 8000

Supported LBA Sizes (NSID 0x1)
Id Fmt Data Metadt Rel_Perf
0 + 512 0 0

=== START OF SMART DATA SECTION ===
SMART overall-health self-assessment test result: PASSED

SMART/Health Information (NVMe Log 0x02)
Critical Warning: 0x00
Temperature: 41 Celsius
Available Spare: 100%
Available Spare Threshold: 10%
Percentage Used: 0%
Data Units Read: 12,226,380 [6.25 TB]
Data Units Written: 9,312,151 [4.76 TB]
Host Read Commands: 77,233,903
Host Write Commands: 145,955,761
Controller Busy Time: 488
Power Cycles: 101
Power On Hours: 445
Unsafe Shutdowns: 90
Media and Data Integrity Errors: 0
Error Information Log Entries: 164
Warning Comp. Temperature Time: 0
Critical Comp. Temperature Time: 0
Temperature Sensor 1: 41 Celsius
Temperature Sensor 2: 33 Celsius

Error Information (NVMe Log 0x01, 16 of 64 entries)
Num ErrCount SQId CmdId Status PELoc LBA NSID VS
0 164 0 0x5013 0x4004 - 0 0 -

Was not sure what in the above output was relevant, so I am giving all of it here.

My questions are:

If I TRIM the drive as I already have and then shrink the partition, will that ensure lack of data loss I experienced earlier? Should I maybe set the MX partition to 300 or 400 GB to ensure?

Another command I found, specifically related to NVMe SSDs, was:

The DEALLOCATE operation provides a similar capability in the nonvolatile memory express (NVMe) command set for Peripheral Component Interconnect Express SSDs.

So is one preferred over the other with respect to NVMe? Anyone familiar with the command and its benefits?

And of course all of the reading up on the maintenance of SSDs, especially for longevity, was relevant to the recent article @Rosika had discussed in “hdparm.” Which at the time of reading, I did not understand the importance of using such command on the SSD.

I would like to hear your thoughts on not only the shrinking/adding partitions steps, but the maintenance of NVMe SSDs as outlined above. I would also be interested in hearing why a Linux OS that uses BTRFS system cannot be combined in GRUB with all the ext4 distros. I am a “need-to-understand-why” person. :slightly_smiling_face:

Hopefully, this will be useful not only to me and my projects, but to others as well.

Thanks,
Sheila
2 Likes

Apparently grub can not write on a btrfs filesystem… and it needs to write in /boot/grub/grub.cfg… not at boot time , but when you do update-grub.

So the trick is to make a separate /boot partition and make it ext4…
The rest of linux can be btrfs on the / partition.

I dont think booting is an issue… grub only reads when booting. I think grub can read from btrfs… not sure about os-prober?

2 Likes

I think we are still learning how to best manage all SSD’s.
for example…
I thought the need to trim manually had been replaced by the controller doing it
automatically for you.? Correct me if wrong?

2 Likes

So did I. Guess I should have been keeping up on all of this when I first got them. Assumptions can lead to trouble.

But while I found no “service” for TRIM in MX, apparently it does it (maybe CRON?)

Automatic procedure

MX Linux uses by default an automatic clearing procedure by running the command “trim” on a weekly schedule. This command tells the SSD which blocks of data are no longer considered in use and can be wiped internally.

Checking

In order to check that the trim procedure is actually being carried out, press F4 (or open a terminal) and enter the following command:

$ tail /var/log/trim.log

I checked and found that in addition to the TRIM I performed manually, today, there was an entry last week on Wed. So maybe it is weekly, and I just beat it to it today :smile:

I will need to check as I had read that heavy users need to perform daily, not weekly.

So if TRIM was performed last week, my image was saved 3 days later, and my repartitioning was performed 6 days later, I can see how I might have needed to run it before imaging & before partitioning.

However, I still am unsure if this alone will save data loss when shrinking a partition.

Sheila

2 Likes

I was curious if some sort of trim was being run on my laptop. I found it in the syslog.

syslog.1:2024-06-30T16:49:39.392284-05:00 dpd-u2404 systemd[1]: Started fstrim.timer - Discard unused filesystem blocks once a week.
syslog.1:2024-06-30T17:15:49.349608-05:00 dpd-u2404 systemd[1]: fstrim.timer: Deactivated successfully.
syslog.1:2024-06-30T17:15:49.349636-05:00 dpd-u2404 systemd[1]: Stopped fstrim.timer - Discard unused filesystem blocks once a week.
syslog.1:2024-06-30T20:21:05.409480-05:00 dpd-u2404 systemd[1]: Started fstrim.timer - Discard unused filesystem blocks once a week.
syslog.1:2024-06-30T22:15:19.398135-05:00 dpd-u2404 systemd[1]: fstrim.timer: Deactivated successfully.
syslog.1:2024-06-30T22:15:19.398167-05:00 dpd-u2404 systemd[1]: Stopped fstrim.timer - Discard unused filesystem blocks once a week.
syslog.1:2024-07-01T21:03:34.463709-05:00 dpd-u2404 systemd[1]: Started fstrim.timer - Discard unused filesystem blocks once a week.

As far as data loss due to not running trim before the resize, I wouldn’t think that would cause a problem. My understanding of trim is that it just speeds up write access by marking blocks as available and avoid having to do an erase on the block before the write. Something like that anyway. If that is correct it shouldn’t cause any loss, but might slow it down a bit.

1 Like

So I was thinking something like what defrag in Windows used to do where the blocks were placed contiguously. My lack of understanding in this procedure, I guess, but if you have only used 114 GB of 950 GB, you would think that the 114 GB would be near the start of the partition. So when I give it a lot of extra room in the shrinking process, you think it would work without issues?

When using Gparted to shrink, the yellow area is supposed to indicate the disk usage so shrinking way past that point should not be an issue.

I am now considering 400 GB instead of 200 for the new partition size of MX Linux. Surely there would be nothing beyond that mark that would get removed from the current OS that would cause issues when booting into it afterwards.

Thanks,
Sheila

1 Like

You would sure think the resize would work.

When you restore using Clonezilla can you choose to resize the partition?

I haven’t used it in several years.

Copilot thinks you can do it. See below.

Certainly! To restore a partition using Clonezilla and resize it, follow these steps:

  1. Create the Target Partition:

    • Make sure you have a new target partition (e.g., /dev/sda6) with a size equal to or larger than the original partition you want to restore.
    • If the target partition is larger, Clonezilla can automatically resize it to fit the disk⁴.
  2. Prepare the Clonezilla Image:

    • Copy the Clonezilla image directory of the original partition (e.g., my-image) to a new location (e.g., /home/partimage/my-image-new).
    • Rename all files in the new image directory to match the identifier of the target partition (e.g., replace sda5 with sda6).
    • Modify the contents of the parts text file in the same folder, replacing the original partition identifier with the target partition identifier⁴.
  3. Restore the Image:

    • Use Clonezilla’s interface to select the adapted image (my-image-new) and the target partition location (e.g., /dev/sda6).
    • Clonezilla will now allow you to restore the image to the new partition location⁴.

Remember to adjust the steps according to your specific setup. If the partitions differ in size, there are advanced parameters you can explore on the Clonezilla site⁴. Additionally, if you’re restoring to a larger drive, Clonezilla can handle that as well⁵. Happy restoring! :blush:

Source: Conversation with Copilot, 7/4/2024
(1) system recovery - Clonezilla restoring to a different partition - Unix … system recovery - Clonezilla restoring to a different partition - Unix & Linux Stack Exchange.
(2) Is there a way to restore a clonezilla image to a larger drive?. Is there a way to restore a clonezilla image to a larger drive? - Software - Spiceworks Community.
(3) Create Windows Backup / Restore Partition with Clonezilla by Britec. https://www.youtube.com/watch?v=cEE_vn8E0Kk.
(4) Parted Magic/Clonezilla Tutorial Save/Restore A Disk Image w/Multiple Partitions. https://www.youtube.com/watch?v=c4a5pYTFcL0.
(5) How to Backup & Restore with Clonezilla. https://www.youtube.com/watch?v=lfoSU1iVW1w.
(6) Clonezilla - restore to different partitiion size? - Server Fault. imaging - Clonezilla - restore to different partitiion size? - Server Fault.
(7) The new and definite CloneZilla tutorial - Dedoimedo. The new and definite CloneZilla tutorial.
(8) undefined. Clonezilla - Advanced Mode.

2 Likes

That might be an option I haven’t run across since it is probably in the part-image to part section, and I have always used the image to image section.

Thanks. I only knew it was difficult to restore a larger partition to a smaller one and that you did have to use the part to part option.

Using Gparted, I went ahead and after making another CZ image after trim, shrunk the partition, this time to 400 GB. I rebooted and all is exactly the same.

I do know that since data cannot be overwritten on an SDD, that is why the data has to be erased in order to use those blocks again. Not sure if the trim made the difference this time or the fact that it now has more room…LOL.

Next comes the difficult part of trying to figure out how to boot to the BTRFS install without having to go into BIOS each time and overrride the booting OS.

I had no trouble with the other distros I installed and updating grub after each made them show up in the MX Linux menu at boot.

I am researching to further understand what @nevj instructed, and one person’s explanation was pretty complex. Of course Garuda’s instructions are to only install it first, and that will not do.

Thanks,
Sheila

1 Like

So if I understand what you are saying, that separate /boot partition would be ext4 vs. the normal FAT? And only use that boot partition for the one BTRFS distro?

I made every other OS install using the same EFI/Boot partition as MX Linux. But by creating another ext4 /boot just for that OS, when I update-grub in MX it will then pull that OS into the grub menu like it did with the rest?

I will give it a whirl and report back any issues.

Thanks,
Sheila

How is it that the SSD does not know which blocks are not in use. ?
If every item in a block belongs to an erased file, it should know that. An HDD knows
when a block has been erased?
Seems like SSD’s could do with a bit of intelligence.
Are they tricking us and selling half baked memory banks that pretend to behave like a disk?

1 Like

Make an ext4 partition ( about 3Gb maybe) and a Root btrfs partition for your btrsf linux. When you install use custom partitioning, mount the small ext4 partition to /boot and the btrfs partition to /

It has nothing to do with the EFI partition , which is fat32 and tiny (500Mb).
Thst partition is sometimes mounted to /boot/efi… so it to would in this case mount yona point inside the /boot partition. Your btrfs linux would still use the same EFI
partition as MX etc.

Got it?

Yes, it’s true. A SSD does pretend to be a HDD. :laughing:

Ever heard of garbage collection? More info on how a SSD erase a cell…

3 Likes

Hi @easyt50 ,
I followed your link and found this

" When a file is deleted from a computer, most operating systems (OSes) delete the table of contents entry but do not delete the actual data blocks from the storage media. Hard-disk drives (HDDs) overwrite the unneeded data blocks. Flash SSDs, however, must erase the unneeded data blocks before new data can be written."

So the key problem is SSD’s have to erase blocks before they can be written to.

If garbage collection deals with this, why would trim be needed?
I thought trim was something to do with levelling the usage of all blocks so they wear at equal rates.
If I were trying to achieve that, I would sort the list of available blocks so the least used ones were at the top of the list. Is that what it does?

1 Like

Hi Neville,

Yes that’s true, but I would not say it is a problem. It is the architecture of the device.
HDD’s has sectors and blocks of data, SSD’s has cells and blocks of data.
HDD’s writes over existing deleted data, SSD’s must ease deleted data before it is written to.

From this article I found, garbage collection and Trim are different but work hand in hand.

3 Likes

@easyt50 ,
It seems trim makes sure the list of erased blocks or pages is updated.
I would have thought that would be automatically done by the disks controller?
Why should the OS do it?

1 Like

Hi Neville,

I am no expert on HDD’s or SSD’s. But I really don’t believe the partition problem @Sheila_Flanagan experienced had anything to do the SSD’s Trim command.

Just an opinion.

2 Likes

@nevj

Agree, but now it is getting over my head. It seems it would make a heck of amount of sense to have the controller perform the function.

2 Likes

I think I share that opinion.

2 Likes

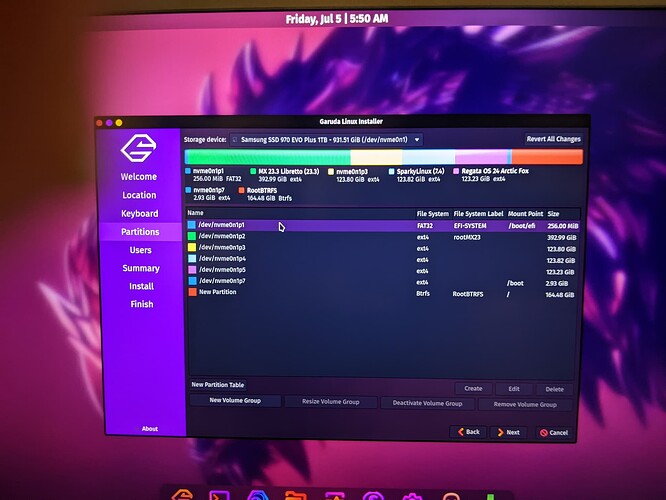
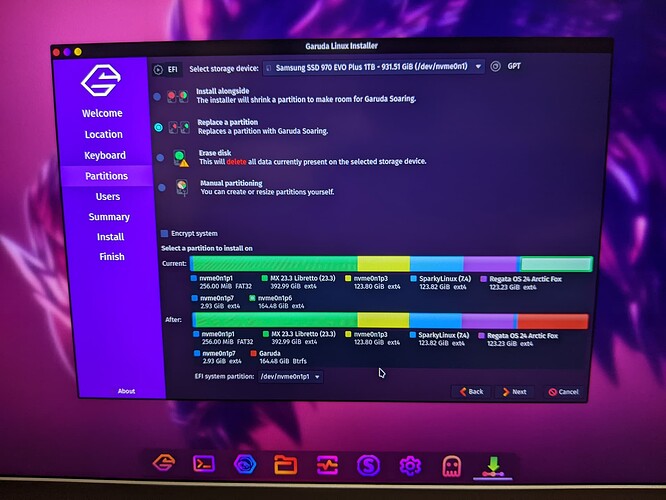
So the issue in trying to set this up was that if you first have your partitions setup (as I did) for the BTRFS Linux, with a 3gb and the root partition for 150 GB, you have two options in installation:

  1. Replace a partition: (the one I have been using) where I replace a partition with the new OS. On that screen you may choose only one partition plus the EFI (indicated at the bottom and by default it uses the existing EFI). So I did not see how I could choose the smaller partition and mount it to /boot.

  1. Manual partitioning: I chose this one and choosing the 3 GB partition edited it to keep (as I already had it as ext4) and mounted it to boot. Then I edited the larger partition to format btrfs & mounted to /.

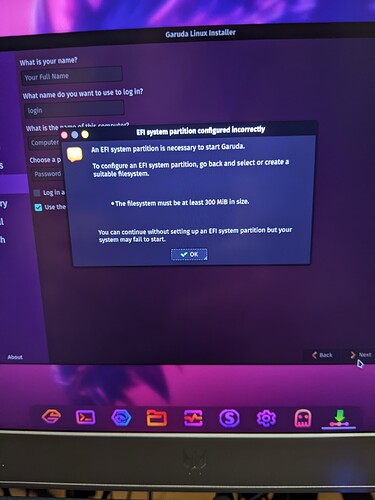
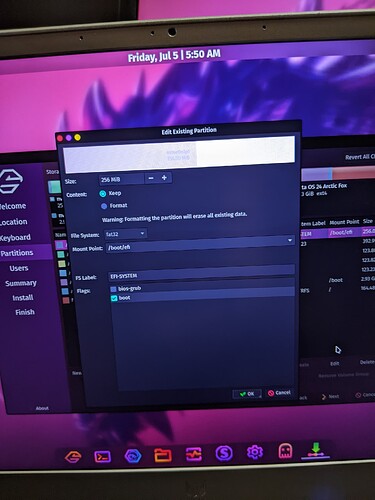
With the second option, I was told I had to have an EFI and to go back and fix that. I did note the part about it being at least 300 MB and mine is only 256 mb, which has sufficed with all other installs.

Nevertheless, I selected the existing EFI and said to KEEP, and it displayed the mount point as /boot/efi and the flag had the “boot” option checked.

If I left it with those options, I would still get the message that I needed to set up an EFI. I tried removing the boot flag, same message. But if you choose option #1 and it lists the current EFI by default, it allows me to advance. Does that mean it does not have to actually be 300 MB size?

So either there is something I am missing or it is not possible to use manual partitioning and use the same EFI as the other Linux OS distros. And it is not possible to choose both the ext4 small partition along with the / partition for installation in option #1.

And that is where the discussion I had seen on this subject involved volumes, subvolumes, etc. that went over my head.

Hopefully the pictures can explain better than my words which options I have and how to get it to work.

Thanks,
Sheila

UPDATE:

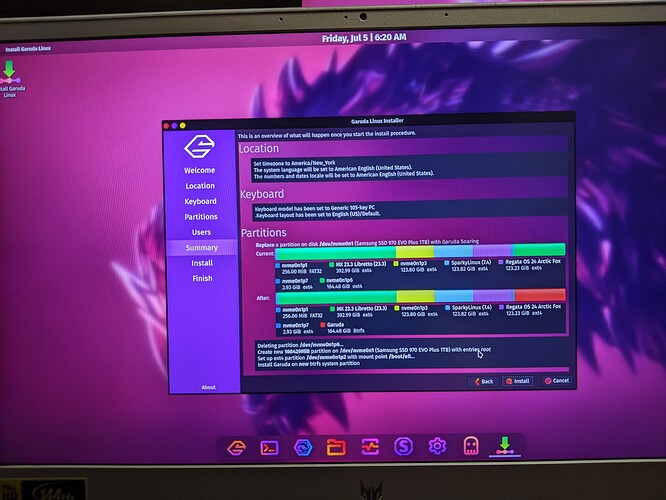
Before quitting the install, I went back to Option #1 and at the bottom instead of using the default EFI all others use, I clicked the dropdown and saw the only other option was partition 2, which is where MX Linux resides. So I chose that one and after continuing got the following screen:

Notice at the bottom it was now going to use my MX partition as the EFI and mount it to /boot with the new partition for Garuda as /.

I will update once I see if it boots, if it is listed in the MX Linux GRUB menu.

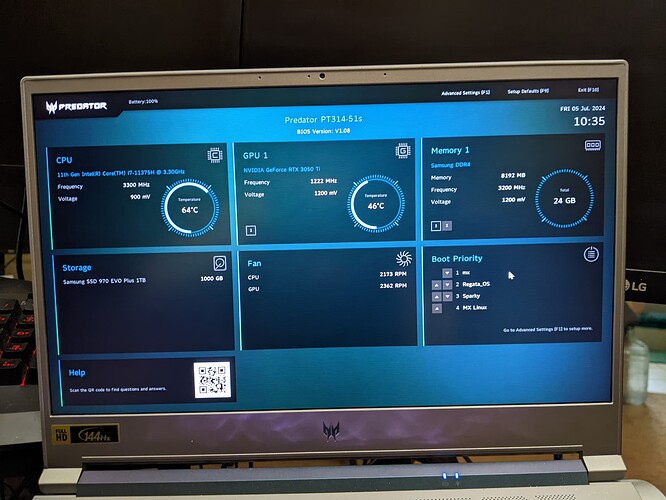
Well not only did it not show up after update-grub, nor with os-prober, it was not to be found in my BIOS. All other distros did in all of those options.

So we know that none of these options allow for setting it up in the ways that I have tried so far.

So far, I did not find these “other” gaming distros to be anything other than a regular Linux OS, be it KDE, Mate, etc. for desktops, and that the only advantage might be for new Linux users who would not understand how to get all of the major gaming sites to be accessible (i.e., Steam, GOG, Amazon, etc.) or how to use the current game managers built for Linux (i.e., Lutris, Wine, POL, etc.) setup. In Regata, there is a pre-built game manager that incorporates all of the major game sites.

So only Garuda remains to be tested and I will have to do more research to figure out how to get a BTRFS system installed alongside my MX Linux.

Sheila