Tutorial: Optimizing External Drive Mounts in Linux with fstab & Bind Mounts for GUI Integration
EDITED: FOR PERMISSION. I forgot that part. when all done like mine needs permissions for timeshift and backuptime.
sudo chown twzzler:twzzler /mnt/backup
sudo chmod 755 /mnt/backup
This guide details a robust method for permanently mounting an external ext4 drive using its UUID in /etc/fstab, while also making it appear as a manageable, ejectable icon in your graphical desktop environment using a bind mount.
Prerequisites
- A formatted external drive (e.g.,
ext4). - Basic Linux terminal knowledge and
sudoprivileges.
Step 1: Identify Your Drive’s UUID
The most reliable way to reference a drive in Linux is by its Universally Unique Identifier (UUID).
- Open your terminal and run:
bash
sudo blkid
- Identify your external drive and copy its UUID (e.g.,
77777777777777777777).
Step 2: Prepare the Mount Points
We will use two directories: the primary system mount point, and a secondary user-friendly mount point on the desktop.
- Create the primary mount directory (e.g.,
/mnt/backup):
bash
sudo mkdir /mnt/backup
- Create the user-friendly mount directory on your desktop (replace
twzzlerwith your username):
bash
mkdir /home/twzzler/Desktop/Backup
Step 3: Edit the /etc/fstab File
The /etc/fstab file controls what devices are mounted automatically at boot.
![]() Safety First: Back up your current
Safety First: Back up your current fstab file before editing.
bash
sudo cp /etc/fstab /etc/fstab.backup
- Open
/etc/fstabin a text editor (e.g.,nano):
bash
sudo nano /etc/fstab
- Add two new lines to the end of the file, replacing the example UUID and username with your own information:
fstab
# --- Current 4TB USB Backup Drive (added 2025-12-07) ---
# Mount the new 4TB USB HDD backup drive (using nofail and sync options)
UUID=xxxxxxxxxxxxxxxxxxxxxxx454 /mnt/backup    ext4    defaults,nofail,sync    0       2

# Bind mount a desktop shortcut that is GUI-friendly and ejectable
/mnt/backup   /home/twzzler/Desktop/Backup  none  bind  0  0
- Save the file and exit the editor (Ctrl+O, Enter, Ctrl+X in
nano).
Step 4: Test the Configuration
Before rebooting, test the mounts to ensure there are no errors.
- Unmount the drive if it’s currently mounted elsewhere (e.g.,
/media/yourname):
bash
# Use 'findmnt' to locate the current mount point, then umount it.
sudo umount /dev/sdb1
- Mount all entries defined in your new
fstabfile:
bash
sudo mount -a
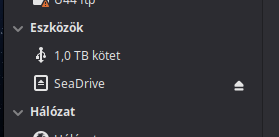
If you see no errors, you should now see an “eject” icon appear on your desktop or file manager sidebar for the Backup directory, which you can right-click to unmount safely.
**
How to Undo These Changes
**
If you decide you no longer want this configuration, the undo process is simple.
Undo Step 1: Unmount the Drives
Safely unmount both mount points from your system before editing fstab.
bash
# Unmount the desktop location
sudo umount /home/twzzler/Desktop/Backup

# Unmount the primary mount point
sudo umount /mnt/backup
Undo Step 2: Restore the Original /etc/fstab
- Open
/etc/fstabin your editor again:
bash
sudo nano /etc/fstab
- Delete the two lines you added in Step 3 of the main tutorial:
fstab
# --- Current 4TB USB Backup Drive (added 2025-12-07) ---
# Mount the new 4TB USB HDD backup drive (using nofail and sync options)
# UUID=xxxxxxxxxxxxxxxxxxxxxxxxxxxx /mnt/backup    ext4    defaults,nofail,sync    0       2

# Bind mount a desktop shortcut that is GUI-friendly and ejectable
# /mnt/backup   /home/twzzler/Desktop/Backup  none  bind  0  0
- Save the file and exit the editor.
Undo Step 3: Clean Up Directories
You can now remove the directories you created:
bash
sudo rmdir /mnt/backup
rmdir /home/twzzler/Desktop/Backup
Your system is now back to its original configuration.
Here are the lines of code block-quoted:
sudo blkid
sudo mkdir /mnt/backup
mkdir /home/twzzler/Desktop/Backup
sudo cp /etc/fstab /etc/fstab.backup
sudo nano /etc/fstab
UUID=xxxxxxxxxxxxxxxxxxxxxxxxxxx /mnt/backup ext4 defaults,nofail,sync 0 2
/mnt/backup /home/twzzler/Desktop/Backup none bind 0 0
# Use 'findmnt' to locate the current mount point, then umount it.
sudo umount /dev/sdb1
sudo mount -a
# Unmount the desktop location
sudo umount /home/twzzler/Desktop/Backup
# Unmount the primary mount point
sudo umount /mnt/backup
sudo nano /etc/fstab
# Delete the two lines you added in Step 3 of the main tutorial:
UUID=xxxxxxxxxxxxxxxxxxxxxxxxx /mnt/backup    ext4    defaults,nofail,sync    0       2
/mnt/backup   /home/twzzler/Desktop/Backup  none  bind  0  0
sudo rmdir /mnt/backup
rmdir /home/twzzler/Desktop/Backup
strong text