Gnome-boxes: communication between guest and host

This is a joint post by @nevj and @Rosika

and

It reports on our collaborative investigations into the gnome-boxes package which
uses qemu/KVM to run virtual machines inside a host Linux system.
We have looked into various ways of making gnome-boxes more usable by establishing
communication between a gnome-boxes guest VM and its host system.

Our post consists of several ‘chapters’ each written in markdown and copied into itsFOSS as a series of separate replies.

Contents

  1. introduction to gnome-boxes
  2. installing gnome-boxes
  3. how gnome-boxes does networking
  4. setting up copy/paste between guest and host
  5. single file transfers
    5a using ssh from guest
    5b using sftp and scp from guest
    5c drag and drop files between host and guest
  6. mounting host filesystems
    6a using sshfs to mount a host filesystem in the guest
    6b using NFS to mount a host filesystem in the guest
    6c gnome-boxes shared folder option
  7. some special tricks
    7a ssh tunneling
    7b enabling ping
    7c NBD mounts
  8. limitations of gnome-boxes

We hope this may be useful to someone who has used gnome-boxes but
has not yet conquered data sharing .
Please let us know of any issues.

Introduction to Gnome Boxes

Gnome Boxes is a user-friendly application for managing virtual machines on Linux systems.
It´s similar to virt-manager but it has some differences as well.
It is designed to provide a simplified user interface catering for the tasks
of creating, configuring, and running virtual machines
without requiring all of the knowledge you´d need for running other virtualization
apps (e.g. virt-manager).

Key Features of gnome-boxes

  1. Simplified Interface: Gnome Boxes offers a streamlined interface that makes
    it easy for users to manage virtual machines without dealing with complex configurations.

  2. Integration with Gnome Desktop Environment: As the name suggests,
    Gnome Boxes is tightly integrated with the Gnome desktop environment,
    providing a seamless experience for Gnome users.
    However it should be no problem running Gnome Boxes with other DEs.

  3. Quick Setup: With Gnome Boxes, users can quickly set up virtual machines.
    You may use pre-configured operating system images or ISO files.

  4. Snapshot Support: Gnome Boxes supports creating snapshots of virtual machines,
    allowing users to save and restore the state of their virtual environments.
    Snapshots can also be created with virsh of course.

Differences between Gnome Boxes and virt-manager

  1. User Interface:
    Gnome Boxes: Offers a simplified and user-friendly interface suitable for casual users.
    virt-manager: Provides a more advanced and feature-rich interface aiming at more
    experienced users and administrators.

  2. Integration:
    Gnome Boxes: Tightly integrated with the Gnome desktop environment.
    virt-manager: Not tied to any specific desktop environment and can be used
    on various Linux distributions.

  3. Feature Complexity:
    Gnome Boxes: Focuses on simplicity and ease of use, offering basic
    virtual machine management features.
    virt-manager: Offers a wide range of advanced features for managing
    virtual machines, storage, networking and more.

  4. Scope:
    Gnome Boxes: Primarily aimed at desktop users who need to run virtual machines
    for testing, development or basic tasks.
    virt-manager: Suited for both desktop and server environments, offering
    an advanced set of management capabilities for virtualization.

Common Features:

Despite their differences, Gnome Boxes and virt-manager share some common features:

  1. Virtual Machine Management: Both tools allow users to create, configure,
    start, stop and delete virtual machines.

  2. Snapshot Support: Both Gnome Boxes and virt-manager support creating and
    managing snapshots of virtual machines.

  3. ISO Installation: Users can install guest operating systems from ISO images
    using both Gnome Boxes and virt-manager.

Links

Installing Gnome Boxes

It was decided to get a fresh install of Boxes in a ‘clean’ environment
provided by a freshly installed distro.
PeppermintOS Devuan Edition was chosen by nevj, Linux Lite was used by Rosika.
Installing Gonme Boxes is easy in any Debian-based systemd:

sudo apt-get install gnome-boxes

However, nevj’s fresh environment proved to be a little too clean. Boxes would launch, but
would not create a virtual machine. I found that I needed

  • libvirtd… provided by package libvirt0
  • qemu-utils package

Then Boxes worked, and I was able to make a VM of Antix (antiX-23-runit_x64-full.iso) to provide
a VM for testing.

Rosika had no problems installing gnome-boxes in Linux-Lite.

Gnome-boxes network setup

Gnome-boxes uses libvirt, the same virtualisation programming interface as is used
by virsh and virt-manager. Boxes only uses the KVM/QEMU support from libvirt, other
libvirt-supported entities such as Xen, VMWare, LXC, BHyve are not available in boxes.

It is important , before using gnome-boxes , to install libvirt, make sure the daemon
libvirtd is running, and add your user name to the ‘libvirt’ group.
If you are already using virt-manager, libvirt will already be setup.
If libvirt has been setup properly, you should see an interface called virbr0

$ ip addr
....
5: virbr0: <NO-CARRIER,BROADCAST,MULTICAST,UP> mtu 1500 qdisc noqueue state DOWN group default qlen 1000
    link/ether 52:54:00:d2:5a:30 brd ff:ff:ff:ff:ff:ff
    inet 192.168.122.1/24 brd 192.168.122.255 scope global virbr0
       valid_lft forever preferred_lft forever

Virbro is a virtual bridge interface. The host sees the bridge (virbr0) as IP address
192.168.122.1, and guest VM systems under virsh or virt-manager
see it as their default gateway.

However gnome-boxes does not use this virtual bridge.
Gnome-boxes uses the same networking setup as the default for QEMU.
In QEMU documentation it is called User Networking or SLIRP.
A representation of the QEMU default SLIRP network is given in the following diagram

which is taken from the QEMU documentation.

Gnome-boxes sets up a virtual network 10.0.2.0/24, in the host, but this virtual
network is not visible from the host.
The default gateway from this gnome-virtual-network, to the host network,
is IP address 10.0.2.2,
and the IP address of the guest interface on this network is always 10.0.2.15. For example

$ ip a
....
2: eth0: <BROADCAST,MULTICAST,DYNAMIC,UP,LOWER_UP> mtu 1500 qdisc fq_codel state UP group default qlen 1000
    link/ether 52:54:00:81:74:26 brd ff:ff:ff:ff:ff:ff
    inet 10.0.2.15/24 brd 10.0.2.255 scope global eth0
       valid_lft forever preferred_lft forever
    inet6 fec0::5054:ff:fe81:7426/64 scope site dynamic mngtmpaddr proto kernel_ra 
       valid_lft 86378sec preferred_lft 14378sec
    inet6 fe80::5054:ff:fe81:7426/64 scope link proto kernel_ll 
       valid_lft forever preferred_lft forever

shows the internal eth0 interface in an Antix gnome-boxes-guest, and

$ ip route
default via 10.0.2.2 dev eth0 
10.0.2.0/24 dev eth0 proto kernel scope link src 10.0.2.15 
10.0.2.2 dev eth0 scope link 

shows the default route is 10.0.2.2.

There is a third IP address set in gnome-boxws ,
the nameserver is IP address 10.0.2.3.
and, if one uses a shared file , there is an optional fourth address 10.0.2.4, which
is an SMB interface.
You can see all of these IP addresses readily if the gnome-boxes-guest is running
‘ConnMan’ instead of ‘NetworkManager’. ConnMan has a really nice UI that shows all
your connections. Here is an example from Antix

Ping does not work over the gnome-boxes network, because some of the network features that
ping uses (eg ICMP) are decativated. One can ssh from guest to host, but not from
host to guest , unless one makes special provisions (see later).

The guest knows the host’s hostname, the name is
unresolved in the guest, unless one sets up an entry in /etc/hosts,
but the packets are routed to the host where they are resolved.

That is all there is to gnome-boxes’ default network setup, it simply uses the QEMU default.
The rest of this topic is about what you can and cant do with this default setup.

Copy and paste between Boxes VM Guest and Host

Setting up copy-and-paste, also known as clipboard sharing, between the guest and host systems in gnome-boxes involves installing and configuring
the spice-vdagent service. This service makes communication between the guest and host systems much easier to handle by enabling clipboard sharing.

The spice-vdagent service needs to be installed and configured on both the guest (Arch Linux virtual machine) and the host (Linux Lite in my case) to enable clipboard sharing between them.
For the guest it may suffice to install spice-client-gtk.

As an example here’s how you can set up copy-and-paste between the guest and host systems in an Arch Linux virtual machine and Linux Lite host:

1. Install spice-vdagent on the Guest (Arch Linux Virtual Machine):

sudo pacman -Syu
sudo pacman -S spice-vdagent
sudo systemctl start spice-vdagentd.service
sudo systemctl enable spice-vdagentd.service

After installing check to see that both daemons are running

$ ps ax | grep spice
19992 ?        Ssl    0:00 /usr/sbin/spice-vdagentd
20262 ?        Ssl    0:00 spice-vdagent

In some distros, spice-vdagent may not be running. One can just start it by
issuing the command ‘spice-vdagent’.

2. Install Spice VDAgent on the Host (Linux Lite):

sudo apt update
sudo apt install spice-client-gtk

3. Test it

You might want to test if clipboard sharing between host and guest works as intended.
Copy text or files in the (Arch Linux) virtual machine and try pasting them into applications on your (Linux Lite) host, and vice versa.

Note:

Although installing the spice-client-gtk package on my Linux Lite host was sufficient to make it all work it may be necessary
to install spice-vdagent on hosts running other distros.

In this case you could do it the following way:

sudo apt update
sudo apt install spice-vdagent
sudo systemctl start spice-vdagentd.service
sudo systemctl enable spice-vdagentd.service

… then check service status: systemctl status spice-vdagentd.service.

The spice-client-gtk package includes tools and libraries for interacting with SPICE (Simple Protocol for Independent Computing Environments) servers and clients, but it doesn’t include the spice-vdagent service, which is responsible for clipboard sharing between the host and guest systems in virtualized environments like gnome-boxes.

However it was enough for providing a flawlessly working copy-and-paste mechanism in my case.
If you encounter any issues or limitations related to clipboard sharing, you may want to consider installing spice-vdagent on your host to ensure full compatibility and functionality with gnome-boxes (or even other virtualization platforms).

Links:

Single File Transfers

Notice: For my experiments I was using Linux Lite 6.2 (based on Ubuntu) as host and Archlinux as guest

Using SSH , SCP and SFTP Between Guest and Host:

On Linux Lite (Host System):

Install SSH Client and SSH server:

  • Open a terminal on your host system. ( Linux Lite in my case)
  • Run the following commands to install the SSH client and SSH server
sudo apt update
sudo apt install openssh-client openssh-server 

On Arch Linux (Guest System):

1.Install SSH Server:

  • Open a terminal on your guest system (Arch Linux in my case).
  • Run the following commands to install the OpenSSH package (which includes the SSH server):
sudo pacman -Syu # to upgrade Arch first
sudo pacman -S openssh
sudo pacman -S fuse3

2.Enable and Start SSH Service:

sudo systemctl enable sshd
sudo systemctl start sshd

3.Check SSH Status:

… to ensure that the SSH service is running

ps ax | grep sshd
or

systemctl status sshd
● ssh.service - OpenBSD Secure Shell server
     Loaded: loaded (/lib/systemd/system/ssh.service; enabled; vendor preset: e>
     Active: active (running) since Thu 2024-02-29 14:42:22 CET; 2h 24min ago
     [...]

Using SSH and SFTP:

  1. SSH Connection from Guest to Host:

working with the host´s ip address:

  • In your Arch guest system, open a terminal.

  • In case you don´t know it already you have to obtain your host´s ip address first.
    You can use command-line tools within the host to retrieve its ip address. For example, you may use commands like ifconfig
    or ip addr to display network interface information, including the ip address assigned to your host.

  • example for ifconfig:

 	
enx001e101f0000: flags=4163<UP,BROADCAST,RUNNING,MULTICAST>  mtu 1500
              inet 192.168.8.102  netmask 255.255.255.0  broadcast 192.168.8.255
			  [...]	

… indicating the respective ip address is 192.168.8.102.

  • example for ip addr:
ip addr
[...]
4: enx001e101f0000: <BROADCAST,MULTICAST,UP,LOWER_UP> mtu 1500 qdisc fq_codel state UP group default qlen 1000
    link/ether 00:1e:10:1f:00:00 brd ff:ff:ff:ff:ff:ff
    inet 192.168.8.102/24 brd 192.168.8.255 scope global dynamic noprefixroute enx001e101f0000

… providing the same result.

  • Use the following command to connect to your host system via SSH:

ssh username@host_ip_address

Replace username with your username of the host and host_ip_address with the ip address of your host.

example:

arch@archlinux ~> ssh rosika@192.168.8.102
rosika@192.168.8.102's password:
Welcome to Linux Lite 6.2 (GNU/Linux 5.15.0-97-generic x86_64)
[...]
rosika@rosika-Lenovo-H520e ~> whoami
rosika
rosika@rosika-Lenovo-H520e ~> pwd
/home/rosika
rosika@rosika-Lenovo-H520e ~> exit
Connection to 192.168.8.102 closed.
arch@archlinux ~> 

working with the host´s hostname:

  • in case you don´t know it already get your host´s hostname: hostname.
    In my case the command provides the output “rosika-Lenovo-H520e”.

  • Trying to ssh into the host from the VM for the first time gave me the following information:
    “ssh: Could not resolve hostname rosika-lenovo-h520e: Name or service not known”.
    So I had to resolve the hostname “rosika-lenovo-h520e” to an ip address first.

This was done by editing the /etc/hosts file.

Open the /etc/hosts file on your VM using a text editor.
Add an entry mapping the hostname “rosika-lenovo-h520e” (your hostname, of course) to the corresponding IP address.
The entry should look like this:

192.168.8.102 rosika-lenovo-h520e

Save the file and exit the text editor.

This is an example using my system. You´d have to provide your own hostname and the correct ip address.

Now ssh-ing into the host works:

ssh rosika@rosika-Lenovo-H520e
The authenticity of host 'rosika-lenovo-h520e (192.168.8.102)' can't be established.
[XXXXXXX] key fingerprint is SHA256:[XXXXXXXXX....].
This host key is known by the following other names/addresses:
    ~/.ssh/known_hosts:1: 192.168.8.102
Are you sure you want to continue connecting (yes/no/[fingerprint])? yes
Warning: Permanently added 'rosika-lenovo-h520e' [XXXXXXX] to the list of known hosts.
rosika@rosika-lenovo-h520e's password:
Welcome to Linux Lite 6.2 (GNU/Linux 5.15.0-97-generic x86_64)
[...]
Willkommen zu fish, der freundlichen interaktiven Shell
Type help for instructions on how to use fish
rosika@rosika-Lenovo-H520e ~> exit
Connection to rosika-lenovo-h520e closed.
arch@archlinux ~> 

Note:

The respective fingerprint has to be added when trying to connect for the first time. This has to be done only once.

When you connect to a remote host for the first time, SSH compares the fingerprint of the remote host’s public key with the one stored in your known_hosts file.
If the fingerprint doesn’t match or if the remote host’s key isn’t in your known_hosts file, SSH prompts you to confirm whether you want to
add the host’s key to the known_hosts file (~/.ssh/known_hosts).

By saying “yes” and adding the fingerprint, you’re acknowledging that you trust the remote host’s identity and want to proceed with the connection.

This is a security step to ensure that you’re connecting to the correct host and not falling victim to a man-in-the-middle attack.

working with the VM´s ip number on boxes virtual net:

It´s also possible to ssh from a virtual machine (VM) running in Gnome Boxes to the host machine using the host’s IP address on the virtual network.

When you’re using gnome-boxes, it creates a virtual network interface on the host machine to facilitate communication between the host and guest VMs.
This virtual network interface typically has its own IP address range separate from the host’s actual network interface.

The host’s IP address on the virtual network is 10.0.2.2, and we should be able to ssh from the guest VM to the host using that ip address.

arch@archlinux ~>  ssh rosika@10.0.2.2
The authenticity of host '10.0.2.2 (10.0.2.2)' can't be established.
XXXXXXX key fingerprint is SHA256:[XXXXXXXXX....].
This host key is known by the following other names/addresses:
    ~/.ssh/known_hosts:1: 192.168.8.102
    ~/.ssh/known_hosts:5: rosika-lenovo-h520e
Are you sure you want to continue connecting (yes/no/[fingerprint])? yes
Welcome to Linux Lite 6.2 (GNU/Linux 5.15.0-97-generic x86_64)

 * Documentation:  https://help.ubuntu.com
 * Management:     https://landscape.canonical.com
 * Support:        https://ubuntu.com/pro

[...]

You have mail.
Last login: Fri Mar  1 17:20:47 2024 from 192.168.8.102
Willkommen zu fish, der freundlichen interaktiven Shell
Type help for instructions on how to use fish
rosika@rosika-Lenovo-H520e ~> whoami
rosika
rosika@rosika-Lenovo-H520e ~> exit
Connection to 10.0.2.2 closed.
arch@archlinux ~> 

Note: see above

SSH is of limited usefulness. To transfer files one needs to use sftp or scp

  1. SFTP File Transfer:

To transfer files between your guest and host systems using SFTP, you can use the sftp command in your guest system’s terminal:

sftp username@host_ip_address

This way you can upload and download files securely.

example:

archlinux ~> sftp rosika@192.168.8.102
rosika@192.168.8.102's password:
Connected to 192.168.8.102.
sftp> help
Available commands:
[...]
get [-afpR] remote [local]         Download file
[...]
put [-afpR] local [remote]         Upload file
[...]
sftp> bye
arch@archlinux ~>

Note that all of the 3 ways of specifying a host in the ssh command apply also to sftp.

  1. SCP File Transfer:

scp (secure copy) is a command-line utility that allows users to securely copy files and directories between hosts over an SSH connection.

This is the general syntax: scp [options] source destination.

example:

The aim is to copy a python file from Archlinux (running in gnome-boxes to the Linux Lite host.

arch@archlinux ~> scp /home/arch/Ergänzungen_zu_Programmen/zu_passphrasegen/passphrasegen-script.py rosika@192.168.8.102:/media/rosika/f14a27c2-0b49-4607-94ea-2e56bbf76fe1/DATEN-PARTITION/Dokumente/Ergänzungen_zu_Programmen/zu_passphrasegen/
rosika@192.168.8.102's password:
passphrasegen-script.py                         100%  549   101.1KB/s   00:00    
arch@archlinux ~>

Notes:

  • scp encrypts both the file contents and the file metadata during the transfer, thus ensuring data integrity.
  • It uses SSH for authentication, allowing users to securely transfer files using their SSH credentials.
  • The -r option enables recursive copying, allowing users to copy entire directories and their contents in a single command.

Note that all of the 3 ways of specifying a host to the ssh command apply also to scp

Additional Remarks:

We´ve been covering file transfers operated from within the gnome-boxes guest only. The transfers can be in either direction, guest to host or host to guest, but must be controlled from the guest.
The methods described here wouldn´t work the other way round ( ie operated from the host), unlike in virt-manager.

That´s due to the fact that gnome-boxes and virt-manager handle networking differently, which affects how you establish connections between the host and guest systems.

  • Gnome Boxes Networking:

Gnome Boxes typically sets up a NAT (Network Address Translation) network by default for its guests.
This allows the guest systems to access resources on the host and the internet. However, connections from the host
or even from any other machines on the network to the guest are not enabled.

In this setup, the guest system (Arch Linux in my case) obtains an IP address from the internal NAT network,
which may not be directly accessible from the host system.

  • Virt-manager Networking:

Virt-manager, however, offers more flexibility in networking configurations. While it can set up NAT networks,
it can also handle various other network configurations, like bridged and host-only networking.
In a bridged network configuration, the guest system obtains an IP address from the same network as the host system,
which should make it accessible from other machines on the network.

Links:

Drag and Drop Files between Host and Guest with Thunar

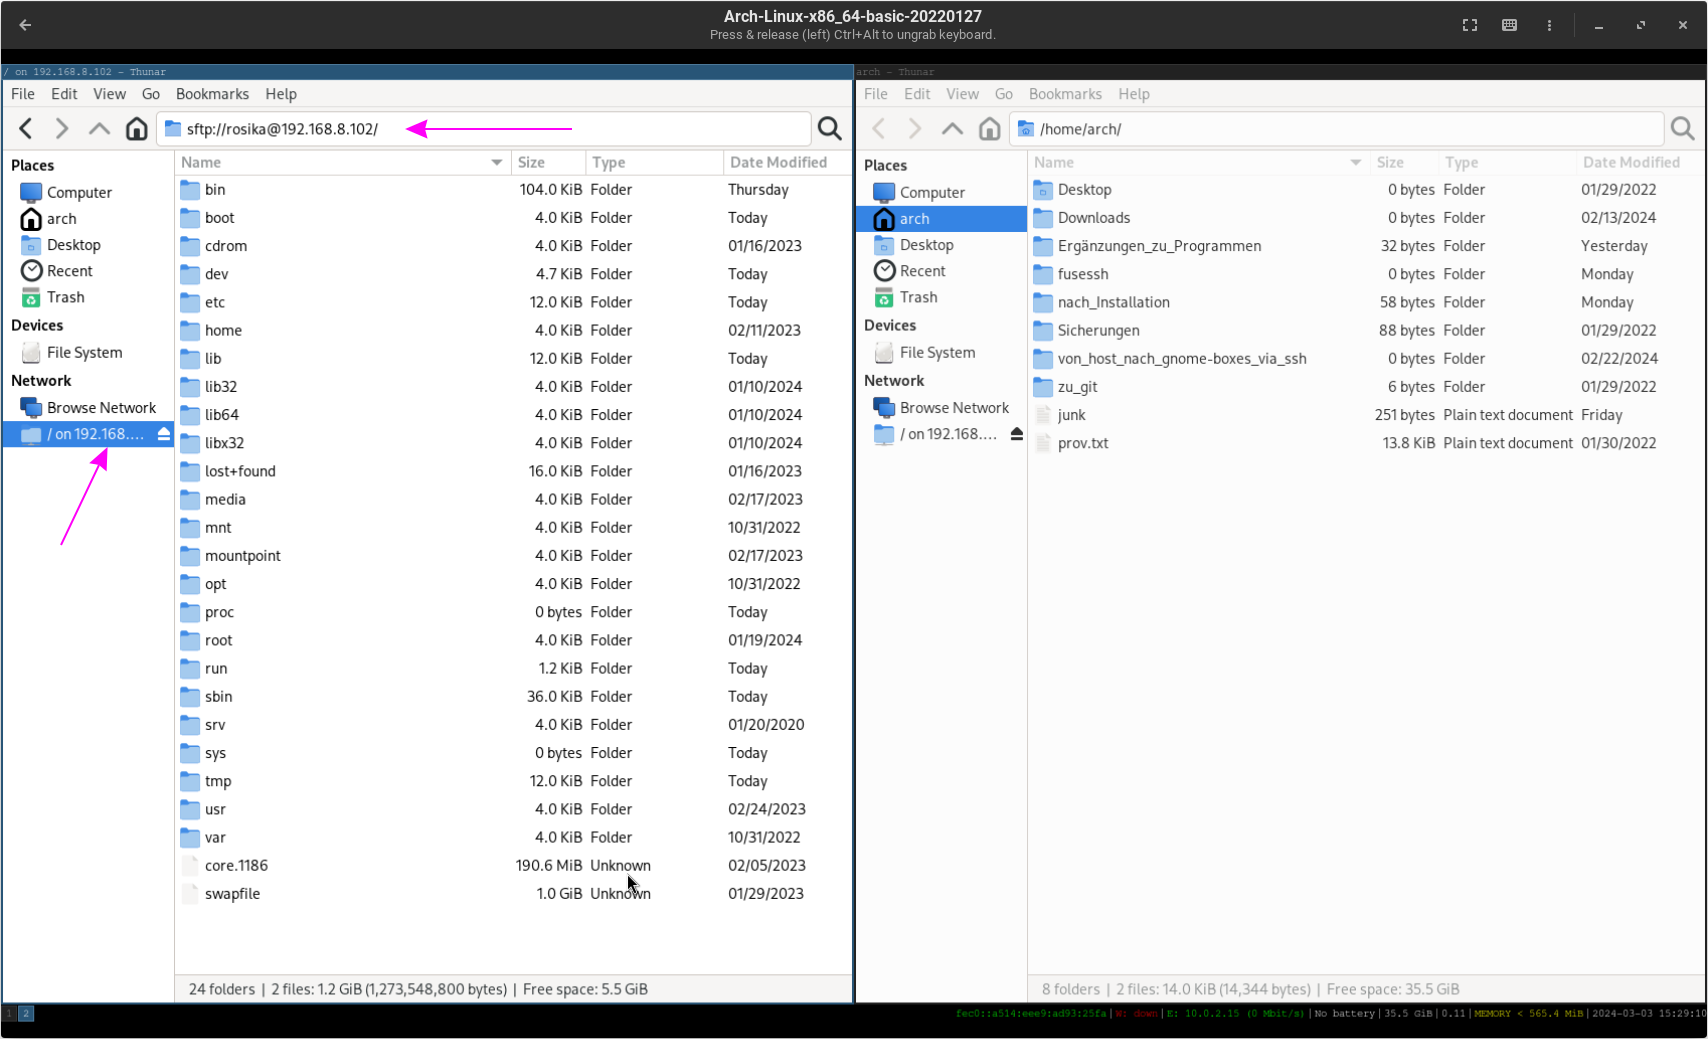
One of the convenient features of Gnome Boxes is the ability to transfer files between the host and guest operating systems using thunar
in a simple and effective way. Thunar is the default file manager in many Linux distributions, however the procedure should work
with other file managers which support the ssh protocol, like nautilus and konqueror, as well.

  1. In the guest open 2 instances of thunar next to each other.

  2. In one of them navigate to the address bar and enter the host´s ip address: ssh://username@host_ip_address.
    In my case it was: ssh://rosika@192.168.8.102.

    Replace username with your host username and host_ip_address with the ip address of your host machine on the virtual network.

  3. You will be prompted to authenticate with your host’s password (popup window).

  1. After successful authentication, the address bar changes to sftp://username@host_ip_address, indicating a secure FTP connection
    to the host’s file system. Thunar now displays the root directory of the host machine, allowing you to browse its contents.

  1. With thnunar open to the host’s file system, you can navigate to any directory and locate the files you wish to transfer.
    Simply drag the files from the host’s thunar window and drop them into the guest’s thunar window.
    The files will be seamlessly transferred from the host to the guest over the secure SSH connection.

  1. After you´re done just unmount it from thunar´s network listings.

  2. For convenience you may also create a respective bookmark in thunar, so accessing any of the host´s files at a later time
    would be much easier.

Benefits:

  • Seamless Integration: thunar’s drag and drop functionality provides a seamless way to transfer files between the host and guest operating systems.
  • Security: The use of SSH ensures secure file transfers between the host and guest.
  • Convenience: With just a few clicks, you can transfer files without the need for external storage devices or complicated network configurations.

Mounting host filesystems

Mounting a Remote Directory with SSHFS:

sshfs needs to be installed in both the host and guest systems.
In Debian based systems install with

sudo apt-get install sshfs

Using sshfs:

  • create a local mount point in the VM

mkdir ~/fusessh

  • mount a remote directory from your host

sshfs username@host_ip_address:/remote_directory /local_mount_point

Of course replace username, host_ip_address, /remote_directory, and /local_mount_point with the appropriate values again.

Username can be omitted if it is the same in both guest and host.

example:

arch@archlinux ~> sshfs rosika@192.168.8.102:/home/rosika/Videos/  ~/fusessh
rosika@192.168.8.102's password:
arch@archlinux ~>

Now you can see in the VM´s file manager (e.g. thunar) that fusessh is mounted and have a look at its contents.
Also:

arch@archlinux ~> ll /home/arch/fusessh/
total 12K
drwxrwxr-x 1 arch arch 4.0K Feb 28 18:17 kgw/
-rw-rw-r-- 1 arch arch    6 May  8  2023 test4.txt
drwxr-xr-x 1 arch arch 4.0K Aug 27  2023 vlc_logs/

Unmounting can be done with:

arch@archlinux ~> fusermount3 -u ~/fusessh

Making an NFS mount of a host filesystem

1 . In the host system install the following packages

nfs-kernel-server
nfs-common
libnfs13
libnfsidmap1

Those are Debian package names
and
make sure the daemons nfsd, rpc.mountd, rpcbind, rpc.idmapd, and rpc.statd are running

2 . In the host system edit the file /etc/exports and add a line

/common *(ro,sync,no_subtree_check,no_root_squash,insecure)

of course, replace my /common with the directory you wish to export.
This exports to all hosts, the * is a wildcard for hostname.
It can be ro or rw.

Then follow this with
exportfs -a
and check the setup with
showmount -e

3 . In the guest system install the following

nfs-common
libnfsidmap1

Those are Debian package names,
and make sure the daemons rpcbind, rpc.idmapd, and rpc.statd are running
You can check that the guest can see the exported filesystem
with

showmount -e trinity

in the guest. It should report the same exported filesystems
as it does in the host.

4 . Configure the /etc/hosts file in host and guest.
This is non-essential, but it allows use of hostname.
Add the hostname and IP number of host and guest to each hosts file.

5 . Make a mount point in the guest
mkdir /mnt/hostcommon
subsitiute you own mount name

6 . Do the mount
mount -t nfs trinity:/common /mnt/hostcommon
that is using the hostname trinity
or
mount -t nfs 192.168.32.6:/common /mnt/hostcommon
that is using the host’s IP number. It can be a static IP number or the DHCP port used
for internet connection.
or
mount -t nfs 10.0.2.2:/common /mnt/hostcommon
that is using the gnome-boxes gateway IP number

7 . Check the mount is present using df

# df
Filesystem       1K-blocks      Used Available Use% Mounted on
....
trinity:/common 1116210176 108697600 950785024  11% /mnt/hostcommon

Permanent mounts

If you require an nfs mount every time you start the guest VM,
put the following in /etc/fstab in the guest system

192.168.32.6:/common /mnt/common nfs rw,hard 0 0

of course substitute your IP number or hostname and your filename and mount point.

Some points to consider

  • NFS works over a NAT connection. There is no need for a bridge to use NFS.
  • Not sure why it was necessary to use ‘*’ in /etc/exports in the host.
    I tried a specific IP address ( 10.0.2.15 ) and it gives the message
mount.nfs: access denied by server while mounting trinity:/common

I think that is because 10.0.2.15 is behind NAT… although NFS works over NAT, exportfs
seems not to work?
Theoretically one should only need to export a filesystem to a specific guest,
not to everyone, which is what ‘*’ implies.

  • There is no setting in the gnome-boxes preferences menu which helps with this.
    It has to be setup from the CLI outside of gnome-boxes.
  • Because of the amount of trial and error involved in working out how to do this,
    there may be other requirements which have been overlooked in the writeup, particularly
    for non-Debian-based distros in host or guest. Please advise if you discover extra
    requirements.
  • If you have problems with the mount try

mount -t nfs -vvvv trinity:/common /mnt/hostcommon

to get more information.

  • In some guests the routing table is not correct. For example in a Devuan5 guest I
    had no default route. After consulting what Antix had in its routing table, I made the following
    modificatiuons in Devuan5
ip route add default via 10.0.2.2 dev eth0
ip route add 10.0.2.2 dev eth0 scopr link

Antix used 10.0.2.2, the gateway to the host in gnome-boxes’ virtual network.
I can now do the nfs mount in a Devuan5 guest.
Its route table looks a follows

$ ip r
default via 10.0.2.2 dev eth0 
10.0.2.0/24 dev eth0 proto kernel scope link src 10.0.2.15 metric 100 
10.0.2.0/24 via 10.0.2.0 dev eth0 proto static metric 100 
10.0.2.2 dev eth0 scope link 
169.254.0.0/16 dev eth0 scope link metric 1000 

Using the gnome-boxers shared file facility

There is , under Preferences in the gnome-boxes menu of a running guest, an
option to define a ‘Folder’ (ie a directory) that is to be shared between guest and host.
Unfortunately we were unable to get this to work. There is a reference

and one of the requirements it mentions is the package spice-webdavd.
That package seems to be only available under Debian, and when we used it
in a Debian guest, it did not function.

So while a GUI method of sharing a ‘Folder’ exists in gnome-boxes, the fact that it does not function means that one has to make mounts at the CLI using either sshfs or nfs.
Both CLI methods are , however , more flexible, you can make multiple mounts, and, in the case of ‘nfs’ you can make the mount happen at every boot by including it in /etc/fstab.

Some special tricks

Reverse ssh and sftp from host to guest

ssh and sftp from host to guest are not possible with the default Boxes setup.
Boxes does not by default make a bridge device for the guest VM, so the host
can not see it or get its IP number.
However it is possible to use a technique called reverse tunnelling

From inside my Antix23 Boxes guest run

ssh -NT -R 2222:localhost:22 nevj@_gateway
ignoring bad CNAME "_gateway" for host "_gateway": domain name "_gateway" starts with invalid character
The authenticity of host '_gateway (10.0.2.2)' can't be established.
ED25519 key fingerprint is SHA256:VPekPjtGyeXGQx+l2qWq8Nn8OKpSb/6OZ4elzZ0wWG4.
This host key is known by the following other names/addresses:
    ~/.ssh/known_hosts:1: [hashed name]
    ~/.ssh/known_hosts:4: [hashed name]
Are you sure you want to continue connecting (yes/no/[fingerprint])? yes
Warning: Permanently added '_gateway' (ED25519) to the list of known hosts.
nevj@_gateway's password: 

The terminal will hang

Then form my Peppermint host do

nevj@trinity:~$ ssh -p 2222 nevj@localhost 
The authenticity of host '[localhost]:2222 ([::1]:2222)' can't be established.
ED25519 key fingerprint is SHA256:GdFiD+LFuxBfvpAZFil72zJGUgoZTASUfunpVGVPd88.
This key is not known by any other names.
Are you sure you want to continue connecting (yes/no/[fingerprint])? yes
Warning: Permanently added '[localhost]:2222' (ED25519) to the list of known hosts.
nevj@localhost's password: 
Linux antix23 6.1.42-antix.1-amd64-smp #1 SMP PREEMPT_DYNAMIC Mon Jul 31 18:30:05 EEST 2023 x86_64

The programs included with the Debian GNU/Linux system are free software;
the exact distribution terms for each program are described in the
individual files in /usr/share/doc/*/copyright.

Debian GNU/Linux comes with ABSOLUTELY NO WARRANTY, to the extent
permitted by applicable law.
You have no mail.
nevj@antix23:~

So it works, I can ssh into my Antix VM from my Peppermint host.
It also works for sftp

nevj@trinity:~$ sftp -P 2222 localhost
nevj@localhost's password: 
Connected to localhost.
sftp> bye
nevj@trinity:~$ 

So sftp can use an ssh reverse tunnel.

Enabling ping in the guest VM

To make ping work in a boxes guest, one needs to make a new group called
unpriv_ping in the host, and add your user login name to that group.
So in the host do

usermod --appens --groups unpriv_ping nevj

then look at the file /etc/group and see the line

unpriv_ping:x:1003:nevj

that tells us that unpriv_ping is groups number 1003.

Then go to the file /etc/sysctl.conf and add the line

net.ipv4.ping_group_range = 1003 1003

Check with sysctl -p

sysctl -p
net.ipv4.ping_group_range = 1003 1003

that looks right, so reboot

Then open a boxes VM and try ping name_of_host
it should work like this

nevj@debian12vm:~/Desktop$ ping trinity
PING trinity (192.168.0.56) 56(84) bytes of data.
64 bytes from trinity.modem (192.168.0.56): icmp_seq=1 ttl=255 time=0.367 ms
64 bytes from trinity.modem (192.168.0.56): icmp_seq=2 ttl=255 time=0.411 ms
....

My hostname is trinity.
One can ping any computer or network device reachable from the host.
That will work for all guests supported by the current host.
If one changes hosts, one would obviously have to configure it again in the new host.

Using qemu-nbd to mount the gnome-boxes VM file

The gnome-boxes VM files are located at

~/. local/share/gnome-boxes/images

They are QCOW2 files. One can mount a qcow2 file using qemu-nbd and thsi allows one to
read and write on the virtual filesystem that it contains.
The details are given here for virt-manager files,

but gnome-boxes VM files are accessible in the same way.

One reason for doing this would be if a gnome-boxes VM would not boot and one needed to
enter the virtual filesystem and edit some files.

Warning: Do not do an NBD mount while the VM is in use.

Limitations of gnome-boxes

The main limitations of gnome-boxes are

  • it can only run one guest VM at a time
  • remote access to a guest VM is impossible without special tricks
  • one can not setup access to specific host hardware such as usb drive
  • the shared folder option does not work (for us)

Those limitations do not really affect normal desktop use, because one can

  • copy single files between host and guest
  • mount a host filesystem in the guest.

Acknowledgement

Only one person can post a topic. While that task fell to me, it should be
recognized that this topic is a joint work with equal contributions from Rosika and nevj.

2 Likes

Boxes has more tricks than I realized. I just use it to take a look at an ISO. Then I delete it and try another one. Never tried moving a file from a Boxes session to the host session. It’s the simplest VM there is.

3 Likes

Hi Bill,
Yes, you can get some useful work done in a gnome-boxes Guest. That is what we set out to demonstrate.
Regards
Neville

2 Likes

Hi @abhishek ,
Regarding your article

Both Rosika and I tried to follow the article, and reported some difficulties.
I have now tried again, using a Debian12 boxes guest.
I installed spice-webdavd and it is running
When I try to drag and drop from a Thunar window in the host, to the guest ,
I get the popup saying the file will be downloaded into ~/Downloads,
but
the file appears in ~/Desktop.
You can see in the shot below, I have several files *.out that I dragged into the guest, I have the Spice Client Icon in the guest’s File Manager, but the files appear in ~./Desktop and also as icons

So, what we said in out post is not quite correct, the gnome-boxes file sharing
option works, but in an unexpected way which is not as your article describes.

I wonder if there have been changes to boxes or spice-webdav, since you wrote the article?

There remains the issue that spice-webdavd seems to be unavailable in some distros.

Regards
Neville

2 Likes

Hmm… that’s weird… because ideally it should go in the Downloads folder.

2 Likes

Hi Rosika and Neville,
Congrats on another excellent team tutorial.
Many thanks to both of you.

Jorge

2 Likes

Hi Jorge, :wave:

thank you very much for the compliment. :heart:
Also on behalf of Neville, if I may be so bold as to say so.

It´s highly appreciated.

All the best and cheers from Rosika :slightly_smiling_face:

2 Likes

Hi Jorge,
Thank you for kind words.
Lets hope someone finds the topic useful
Regards
Neville

2 Likes