Thanks @Akito .
Yes, that was my thinking some time ago as well.
I´ll take a look at
https://www.linuxandubuntu.com/home/creating-virtual-disks-using-linux-command-line and hope to find out more…
Many greetings
Rosika ![]()
Thanks @Akito .
Yes, that was my thinking some time ago as well.
I´ll take a look at
https://www.linuxandubuntu.com/home/creating-virtual-disks-using-linux-command-line and hope to find out more…
Many greetings
Rosika ![]()
I guess the original img file has no place left to write onto it or is not allowed to be written to.
Is in not read-only, like an iso ![]()
So booting from the img wouldn´t work.
Perhaps a loop device isn´t meant to be written to as the message (see above) would suggest.
Just a guess, I may be totally wrong there…
A loop device is inherently read-only. It’s meant to be read, only (obviously ![]() ).
).
A disk image, like the ones used for Raspberry Pis, are actual, real file systems (not like the ones designed for ISOs), where the operating system is supposed to run on. So, if it’s not a live medium, then it needs writing capabilities.
The img, I suppose, is literally just an image of a drive. Nothing more, nothing less.
I think this issue is a bit amusing, because it seems like everyone is overthinking the situation and making a magic trick out of it, when in fact it’s even simpler than using an ISO!
An ISO is a live medium, which works differently. It is meant to be read-only, etc. However, a disk image is literally just an image of the disk you would usually use. So, it is technically much simpler to understand and use. ![]()
Yes. It’s inherently read-only. It’s never meant to be written to. Which is why it is always used for CDs, DVDs, Blu-Rays, ISOs, etc…
The image itself is just an image. So, it itself is read-only, but it’s meant to be written 1:1 to a disk and then this disk is supposed to be used. The disk image is literally just a disk image. Just an image of a real disk you are supposed to use, of course having writing capabilities.
OK. I did not know that. Abandon loop device option @Rosika
@Akito seems to have the right option.
We have to find out how to use qemu to copy the EasyOS img file onto some disk image format that qemu understands… like what @4dandl4 did with Vbox.
Sorry I created a dead end trail there
Neville
Great. Thanks for the confirmation. ![]()
Right. That would explain why it says on EasyOS Home — Posts tagged "install" :
EasyOS is a Linux distribution deployed as an image-file that may be written to a USB Flash drive, then booted
No. The real problem of the discussion is, that everyone tries to “find out” something. This is the problem.
All that has to be done is writing the image to a virtual drive. Create an empty virtual drive with QEMU, then write the image onto it. Done. Nothing to “find out”. Nothing to think about. Just write the image. That’s it.
So we dd the image onto this empty vìrtual disk , then boot it.
Only thing I dont know is how to make an empty virtual disk,
https://qemu-project.gitlab.io/qemu/system/images.html
Needless to say, it needs to be bigger than the original img, as that one is compacted. One might also need to resize the file system for the additional space to be claimed.
https://raspberry-projects.com/pi/pi-operating-systems/resizing-partitions-disks
I´m just looking at QEMU › Wiki › ubuntuusers.de .
It´s in German, but the contents look promising.
As soon as I come up with something substantial I´ll post it.
May take a while though. ![]()
I did the following:
qemu-img create BOOTSYSTEM.img 10G
Formatting 'BOOTSYSTEM.img', fmt=raw size=10737418240
qemu-system-x86_64 -enable-kvm -hda BOOTSYSTEM.img -cdrom easy-4.3.4-amd64.img -boot d -m 1024
but it yielded an error:
qemu-system-x86_64: warning: host doesn't support requested feature: CPUID.80000001H:ECX.svm [bit 2]
Thanks @Akito for providing a wealth of links. ![]()
As I got
stuck at the moment I´m likely to need them.
Many greetings
Rosika ![]()
P.S.:
I got rid of the error by adding -cpu host to my command:
emu-system-x86_64 -enable-kvm -hda BOOTSYSTEM.img -cdrom easy-4.3.4-amd64.img -cpu host -boot d -m 1024
Now it worked to the point that the OS started but AGAIN stopped with the “No bootable device” error.
Never mind, I´ll keep looking.
The installation instructions by Barry Kauler (How to install EasyOS on a new SSD ) suggest:
To write the file to the drive, in Linux you will need to know its drive name, and be sure that it isn’t mounted. Let’s say that you identify the drive as /dev/sdc, do this as the root user:
# dd if=easy-4.2.2-amd64.img of=/dev/sdc bs=1M
# sync
So what if I changed that command to
# dd if=easy-4.2.2-amd64.img of=BOOTSYSTEM.img bs=1M
# sync
after having created the container with
qemu-img create BOOTSYSTEM.img 10G
That might work ![]()
… or not…
Yes, that’s where I was getting at. It ought to be simple as that. Nothing to “find out” – just write the image. ![]()
Thanks @Akito , I´ll give it a try. ![]()
@Akito
My thinking is this!!! EasyOS.img and AKA (Puppy Linux.iso) will write to (.iso) or flash to (.img) to a usb device (whether connected in Windows or Linux) but that is because drivers for the usb is already in the host OS. Now, could a virtual disk be installed in the host OS and use dd to flash the virtual disk, without the use of qemu or VB?
Just thinking!!!
That’s already starting the wrong way. Thinking is the worst thing a human could possibly do.
@Akito
Well just shoot me!!!
Right, I did that
It went well.
So what I´ve accomplished now is: having installed EaysOS on a virtual drive the same way I did when installing it to a physical stick.
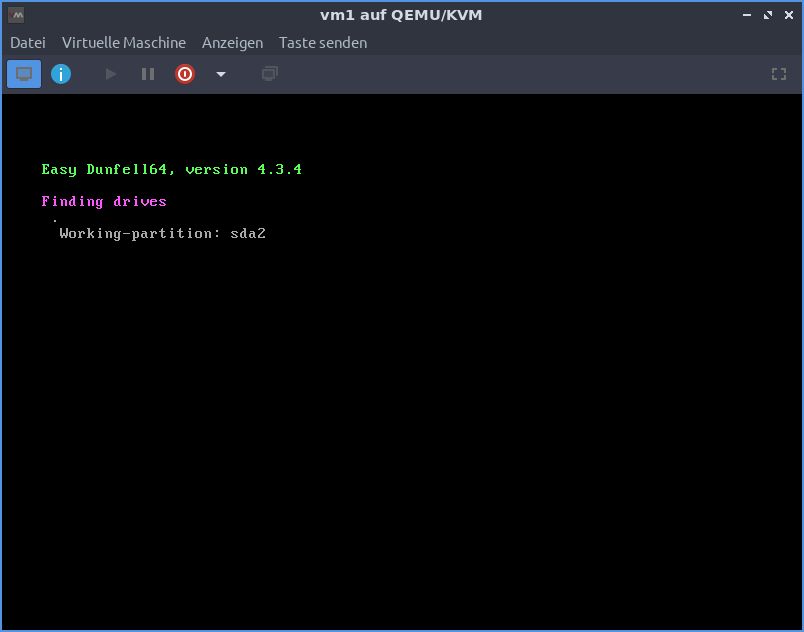
Now it should´ve worked. But when using virt-manager to install a new OS I chose “import existing drive image” - which should be the right option now - EasyOS starts but still hangs at:
Perhaps I should give up as I´m slowly running out of ideas … despite all the great help from all of you. ![]()
Thanks so much.
I´ll have to go to bed now. Perhaps I´ll dream of a solution. ![]()
Many greetings from Rosika ![]()
@Rosika
That is as for as I have gotten using VB!!! If you could make a small paritiion on your boot drive and dd the usb to it, then it may boot.